
Fermented Tomato Conserve (Conserva Cruda Di Pomodoro)
As you improve the health and fertility of your soil, you should start seeing some impressive vegetable harvests. This can be a blessing as well as a curse though. Many people know the old but highly accurate joke about the neighbor that leaves a bag of zucchini on the doorstep, rings the doorbell and runs. This is all well and good, but what to do with 100 pounds of fresh plum tomatoes? Or 150 lbs., 200 lbs. or more? The old doorbell trick will only go so far, so let’s look at a delicious alternative! Tomato conserve is a perfect choice.
Drying and canning are always options, very good ones that should be used. There is another ancient method of preserving the bountiful harvest to capture the fresh flavors for the cold winter and gray early spring months when there wasn’t much of anything fresh available. Fermenting fresh vegetables opens up so many flavors and paths to storing this summer’s bounty for the coming winter. We will look at one such method that not only ferments the over-abundance of tomatoes, but concentrates their flavors as a bonus.
A word about fermenting before we begin is in order, so that you don’t come home one day and throw out the entire project due to a misconception or lack of understanding of how the process works. This particular process uses a wild fermentation, meaning the combination of wild airborne yeasts and the naturally occurring bacteria that is on the tomatoes. This wild fermentation is spontaneous; you don’t do anything to help it along. The acid in the tomatoes provide the perfect environment to support lactic acid fermentation. There will be a surface mold which is white and completely normal. Indeed, the white surface mold is needed to protect the tomatoes from rotting. You should not see any colored mold or offensive “rotting” odors.
This process has been used for several hundred years in Italy; probably the first time was shortly after the tomato made its way from America to Italy in the early 1500s. It is still being used today, all across Italy, as small scale home growers put up their harvests to have the flavor of summer to remember during the coming winter.
The beauty of this method is that it is very scalable, able to handle 20 lbs. in one batch and 100 lbs. or more the next one.
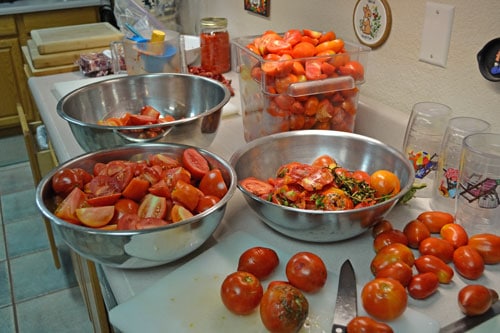
Fresh Tomatoes for Conserve
Start with all of the tomatoes washed, stems and any bad spots removed. Get a container that is larger than the amount of tomatoes, so that when all of the tomatoes are crushed there are several inches of space to the top of the container. If necessary, use more than one container.

Packing Fresh Tomatoes
Crush all of the tomatoes and add them to the container. Stir well and cover with a towel, dishcloth or such to keep insects out while allowing air circulation.

Fermenting Tomatoes
The fermentation happens within a few hours and bubbles will appear, with the solids coming to the top and a white mold forming on them. Remember, white mold is good! Stir twice a day, mixing in the mold. (Note, we did not stir the tomatoes, just let them sit for 5 days and everything turned out fine!)

Fermented Tomatoes
The fermentation will take from 4 to 5 days, depending on temperature and then stop. Remove the solids from the top and strain the mixture through a strainer. One of the best ways to do this is by using a hand cranked device that separates the skins and seeds from the pulp, called a Squeezo or Roma food strainer. The Squeezo is all metal and more expensive but will last several lifetimes!
After straining, keep the pulp and compost the seeds and skins. (As a side note, it you are wanting to save the seeds from those wonderful tomatoes, just transfer them into another bucket for a second ferment for a couple of days, scoop off the mold on top and strain out the seeds. Rinse thoroughly and dry on paper towels with the seeds spread out.)
Fermented Tomato Pulp
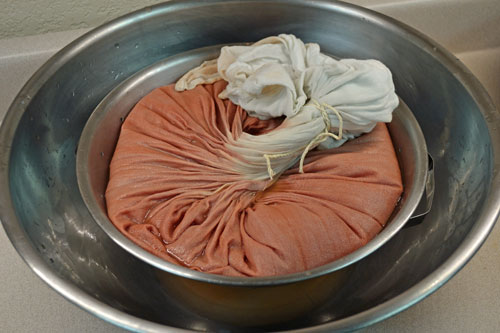
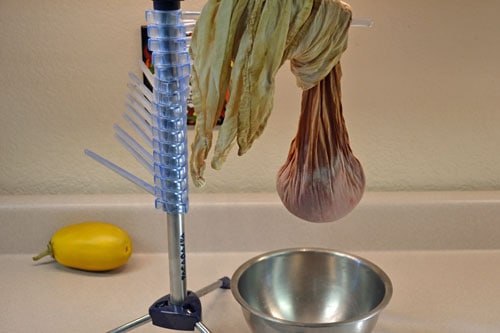
The pulp will still have a lot of moisture that needs to be removed. Do this by further straining the pulp in a fine mesh bag or cheese making bag over the sink or a catch bowl. Tie the bag closed, let it hang and drip liquid for a day. It may become covered with a layer of white mold again, just “shave” it off after it finishes the drip process.
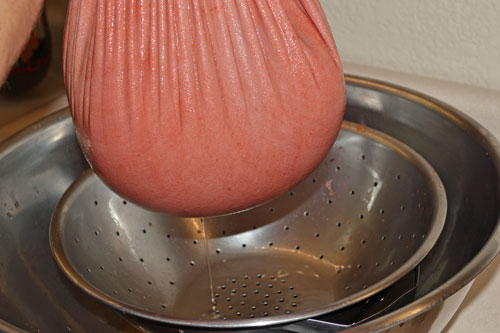
Draining Tomato Pulp
The pulp will be noticeably drier and reduced in volume. If the consistency is thick enough for you, stop here. If not, put the bag between two boards or plates with a weight on top to compress it and further drain moisture out for another day or two.
Drained Tomato Pulp
When it is the consistency that you want, traditionally that of firm dough, remove any mold on the bag, open it up and peel it off of the now-firm pulp.
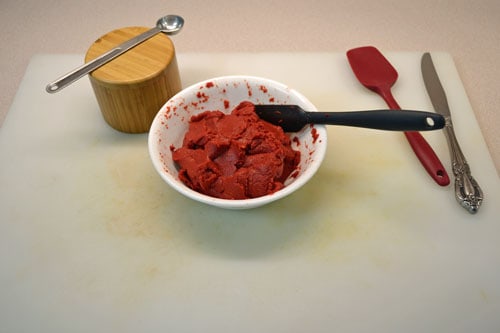
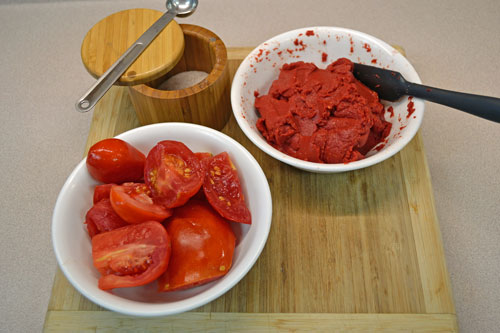
Fermented Tomato Conserve
The Italians add 25 percent salt to the tomato pulp, but most Americans find this to be way too salty. 10 percent is a good starting point, as it is much easier to add salt than to remove it! Mix the salt in well and let sit. After a few hours knead the mixture just like dough to develop the texture and store it in a jar. It does not need to be refrigerated and will last for several months. In Italy it is usually stored in waxed paper. If you do choose to store it in the refrigerator, it should last for a year.
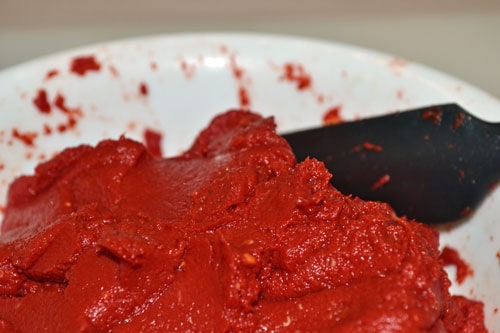
Fermented Tomato Conserve
The end result will be a preserve that is about 8 – 10 percent of the amount of tomatoes you started with. The flavors will be highly concentrated, so a very small amount will add a tremendous amount of flavor to your dishes, from soups, stews and sauces to omelets, dressings and marinades.


 2018 Terroir Seeds | Underwood Gardens


I had not heard of this way of preserving tomatoes. I will try it this summer. What fun it will be! christmas gift perfect.
I have never heard of this before but it sounds like something I would like to try. Thank You.
Give it a try, Smitty! The flavors are powerful and concentrated, much more so than the tomato paste we are used to.
There are many traditional foods from around the world that we as Americans don’t know about because of our being educated by the supermarkets on what our foods should look and taste like, or we have lost the cultural connections in the generations since our families immigrated. Cultural or traditional foods are “uncool” to the younger generation, and are often lost after 2 – 3, sadly.
Enjoy the process, and the concentrated flavor and aroma of summer this coming winter!
You are certainly doing your fermentation the hard way. I never have mold. 1 qt. wide mouth canning jar, 1 tables. good quality salt, 1/4 cup whey (liquid from letting raw milk set for 3 or so days to separate whey an curds), green and red cherry tomatoes whole or cut in half, skin seed and all, fill jar tamp down, fill some more cover with pure water and leave a good 1 1/2 inch of head room, screw on lid and let sit at room temp for 3 to 5 days then put in a cool place. The longer is sets in the cool place the more the flavor develops. I have done this with shredded cabbage, beets & turnips, shredded cabbage & celery(yum), carrots (too sweet), winter squash, string beans. The possibilities are limitless. I add herbs and spices too. . Molds have very long fine roots that penetrate deep into food so scraping it off the surface does not get rid of it.
Great news letter I enjoyed all the articles. I have noticed that the tomatoes and peppers that are deep within the plants, ripen first so they must like some shade.Thanks for the good info. Jessieann
Thanks for the kind words, Jessieann!
This recipe is meant to concentrate the tomatoes, thus the absence of water during the fermentation process. The white mold that forms is not dangerous and is quite edible, as it is the result of the spontaneous fermentation in the lactic acid environment. The acidity of the tomato fermentation rules out malicious molds! This is how Italians have preserved their excess tomato harvests for several hundreds of years, with the added benefit of reducing the conserve to about 8% of the initial volume of the tomatoes.
The method you use and describe is the basic vegetable fermentation that I talk about in “Fermented Pepper Sauce” of “Chop, Salt, Pack and Wait. This is great for many vegetables, but is much more work if you want to produce a conserve at the end of the fermentation, as the water dilutes the concentration.
There are many different methods of fermenting that have been developed and perfected in all parts of the world that we as Americans are simply not used to in today’s world of being educated by the supermarkets as to what our food should look, smell, feel and taste like. Fermentation is just beginning to come back into “style”, as it should!
Great Article Steven, just what I’ve been looking for to do with all the excess tomatoes this year. Last year? Zero. This year? Well, I have 47 qts. stewed tomatoes, several pints and a few ferments. But, this? Yum, I’m on it right now.
That’s great to hear Evelyn, both about your garden’s production and the amount of food you’ve got put up! Please let us know how you like the fermented tomato conserve.
Stephen,
Good article – and useful. I have been fermenting for the past year or so and very much like the results. We have been very dry here in central California (Aromas) but this years tomato and pepper crop have been outstanding. We freeze, make sauces and dry. I will try your recipe and see how it goes.
I do not know if you remember but I am the one who grew the Sonora wheat that I got from you. Thanks for the great information.
??? You have peaked my interest! Where is the recipe for fermented tomato’s?
Bob, the “recipe” is in the article! It walks you through how to do the fermentation.
Good to hear from you, Paul! Yes, please let me know what you think of this fermentation approach.
And yes, I do remember your photos and information on the Sonoran wheat – I’ve used them in the article about the wheat, as well as in our new seed saving class showing a simple approach to threshing and winnowing dry grains at home.
Sounds great. Would it work with green tomatoes? My Brandywine’s don’t seem to be ripening.
Can you do the same thing with peppers? Blend them to a puree first and add a bit of fish sauce and then ferment until in a dough like consistency?
I saw the other recipe for chopped peppers, but I would like to get a pepper conserve… if there is such a thing. Thank you.
Funny you should ask that, Mike! I’m just starting a fermented pepper paste using whey from yogurt as the fermentation starter, as chiles won’t usually spontaneously ferment like tomatoes. I don’t see why you couldn’t do the same type of fermentation, then strain the mixture until it is thickened like the conserve. That would be much like the Korean fermented chile paste!
It should work with green tomatoes, but you won’t have the same flavor. Green tomato conserve would be interesting, though! A bright taste of summer in the dead of winter might be just the ticket.
I am making the conserve, it is slow because room temp is under 70, but I saw the first white mold today after 3 days. No bubbles though. How do you know when the fermentation is done?
Katrina, it may bubble or not and it might mold or not – it depends on your climate and temperatures. We just posted photos in the article of the process that we just did, and it hardly bubbled at all, but did develop some white mold at the top.
The fermentation will continue for a long time if you let it – like months! You choose when to stop it, by taste – most people like the flavors at about 4 – 7 days, but some will go longer for a more pronounced fermented flavor in the paste. We fermented ours for 5 days and the flavors were really well balanced between the fermented taste and the fresh tomato flavor.
I’m definitely going to try this, have some lovely tomatoes for it. But what happens to the leftover liquid – do you drink it? throw it out? ferment it?
I’d be interested in your ideas on that.
Thanks for the video, it’s really helpful!
We didn’t keep the liquid, as we were going for the conserve or paste. I know some folks that swear by adding the fermented liquid to the compost pile, but haven’t had experience in other uses.
When we strained the pulp from the seeds and skins, the liquid didn’t smell bad or anything, it had a ‘tomatoey’ aroma. If you do something with it and it works, please let us know!
Just for info – I didn’t keep the liquid.
The weather here has been unusually warm and my bag of pulp attracts a lot of fruit flies some of which drown in the liquid …. !
As I have no way of getting rid of them, I’m just hoping they’ll get tired of fermented tomato and go somewhere else.
Tomorrow is to be cooler so maybe that’ll help.
Have you had this problem?
If a person does not have the equipment to strain the tomatoes such as the Squeezo how do I improvise and separate the seed and skin from the pulp?
Well, the paste is made and awaiting kneading as you suggest. While the liquid was dripping the bag attracted a lot of fruit flies. No way of getting rid of them. So I just waited and noticed that a lot of them ( not all by any means) drowned in the leftover liquid which needless to say I discarded. Once sufficient liquid had drained out it was easy to put the bag in a large bowl under a weight and cover the lot with a cloth.
I assumed the fermentation process and the bag protect the paste from being contaminated or whatever by fruit flies … I wonder is this naive?!
Referring to an earlier post of yours, you say ‘we Americans’ are unused to these different methods of fermenting – well, I live in France, the supposed temple of good food, and I can assure you that most people have never heard of fermentation here either! We’ve all been misled by the food industry and the supermarkets.
Fortunately there’s a movement everywhere to reclaim our food – fermentation is beginning to be talked about here too!
As long as the flies are outside of the pulp, then you should be fine. Once the mold starts growing on the outside of the bag, it should stop the flied from coming in contact with the bag and pulp.
We haven’t had the flies on the bag, we did have some interested in the fermenting bucket, but the lid or screen on top will keep them out.
You don’t absolutely have to separate the skins/seeds from the pulp, it just makes it easier to work with and a bit more finished looking. An alternative would be to put them into a blender – the more powerful the better – and blend everything together, then put the mixture into the bag to drain the liquid out. The fermentation will really soften the skins, so they should just blend in and add to the flavors.
As long as the bag had some of the white mold growing on it, that should protect it from the flies. As I understand, the flies have to have physical contact to be able to do damage like laying eggs or contaminating the pulp, so the bag and mold will protect it. Remember, this is a lacto-fermentation – meaning an acidic fermentation – where not too many nasties can live. If the mold isn’t’ white, then you’ve got contamination. Otherwise you should be fine.
Karen, it is very enlightening to hear that other countries have fallen away from their traditional food pathways! I always try to speak of what I know, and that is America. I spent a year racing bicycles in Belgium in the mid 1980’s and there were still a lot of the traditional food stores, the supermarkets were brand new and not widely accepted. Fast forward almost 30 years, and I suppose that things have changed a lot!
I am very glad to hear about the return to ‘real’ food! It is happening in a lot of countries as well as here in America, so there is still hope!
You write of covering the original ferment with a towel, yet your pictures are of a solid lid — not to be picky, but wanting to do it ‘right’ — might there be a difference in the microbes that grow? I’m ready to work with the last of the green tomatoes now turned red! Very intrigued by this. Thanks!
Debra, the covering is just to keep flies and other insects out, nothing more. The lactobacillus bacteria already lives on the tomato skins, so you don’t depend on an ‘outside’ bacteria to make the fermentation start. I wrote this from the standpoint that folks will be using a lot of different fermentation containers and may not have a good lid, so the towel, cheesecloth or dish towel method works well.
Good luck and please let us know how it turns out!
My house is cool …. low 60s F which I am sure has slowed down the process. There is now liquid on the bottom of the jar, and bubbles throughout the tomatos.– enough to push it to the cloth, even though there was 1.5 inches of space when packed. No white mold on top though. Smells, but not in a rotten way. Does it sound like we’re on track? How will I know its ready to be drained? Also, I poured hot water over them before starting, and took off some but not all of the skins. Maybe not the thing to do [they had been around for a while, and I was concerned about bad mold.]. Even if this doesn’t work this time, I definitely will try this again. And for now I shall keep observing. Thanks for your feedback!
I don’t think that the mold will always appear. Our first batch had almost no mold, as you can see from the photos in the article. Our second batch had lots of mold and was done a couple of weeks later. Pouring the hot water over the tomatoes might be a factor in the lack of mold, as it is created from the naturally occurring bacteria on the skins of the tomatoes.
I let the fermentation go for about a week. We did the first batch for 5 days, the second went for 8 days.
Good morning.
I’ve done fermented tomato paste before and love it, I would encourage anyone to give it a try.
Question to the author: Your saying you can make it shelf stable at 10-15% salt. How confident are you about that? General wisdom/other recipes are calling for 15% salt to be fridge stable and 25% shelf. Obviously I’m drawn to say 15% for shelf stable as I plan on making a LOT of this in the fall.
David, I mention the 10% salt is a good starting point and will last for several months – this is based on our observations. I’ve got a tiny bit of the original ferment still in the fridge from 2014 – 4 years now and it is still delicious! Obviously different climates will affect the storage life; we are in a very dry climate so things tend to last longer.
I recommend starting with a 10% salt level and experimenting how long it lasts for you – both in the fridge and on the shelf.