
Damping off – Causes and Control
Damping-off is a soil borne disease that can attack almost all young vegetable seedlings. Home gardeners often first notice that something is wrong when the very young seedlings have a constriction around the base of the stem, some of the seedlings have fallen over or there are small flying gnats around the base of the seedlings. Damping off is caused by soil fungi and the right conditions to help them flourish.
If not taken care of, losses can be severe and results in the majority of a flat of carefully planted seedlings dying in 24 to 48 hours. Damping-off can happen before seedlings emerge from the soil. With this type of damping-off, fungi infect seeds as they germinate. As the infection progresses, seeds rot and do not germinate, leading many home gardeners to think that the seed quality is poor. Another result of seedling infected damping-off is poor or weaker seedlings that become apparent days or weeks later.
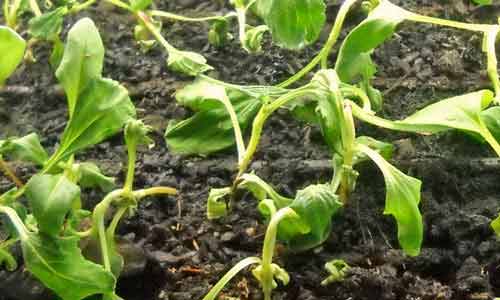
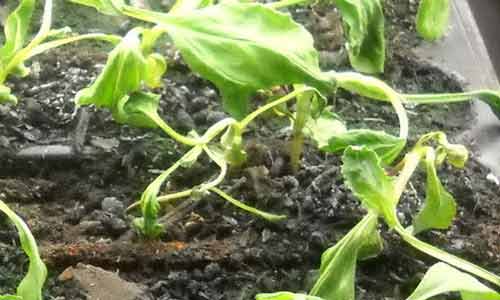
Even if some of the seedlings survive damping off and are transplanted, they are often stunted and have a twisted, constricted or off-color stem – called ‘wire-stem’ – and have health and production issues.
Not everyone experiences damping off, yet other gardeners in the same area fight with it yearly. Some gardeners buy seed starting mix every year, otherwise they suffer large seedling losses; while others (including ourselves) have mixed our own soil for years and have had very little problems. Just because your neighbor or gardening club friend has trouble with damping off, it doesn’t automatically mean you will also. We’ve created this article as a tool to help you troubleshoot and control how and why damping off happens.
Causes of Damping off
The most common cause of damping off is from soil borne fungi from three groups – Pythium, Rhizoctonia, and Fusarium.
Pythium thrives in cool, over-wet and poorly-drained soils and is often the result of over-watering and not maintaining a warm enough soil temperature for the seeds to germinate. Its symptoms are a damp, odorless rot in the root, causing it to be slimy. It may run up the lower portion of the stem and cause it to be black and slimy. Pythium can survive in soil for several years.
Rhizoctonia is present in all natural soils, coming to life when a soil is over-wet and hot. This is the most common occurrence of damping off, as the seedling will have the classic constriction on the stem right around where it touches the soil.
Fusarium thrives in acidic soils that are poorly fertilized and can remain inactive for long periods of time – years. Fusarium infects the seeds, causing many of them to fail to germinate and creating the ‘wire-stem’ appearance in those that do survive.
There are also seed-borne bacterial and fungal pathogens that can decimate seedlings. These are most often seen in seeds obtained from seed swaps or gardening clubs with poor sanitation and handling techniques in processing and packing seeds. If not recognized and corrected, seed borne pathogens will continue to infect future generations of seed that is saved and distributed.
Controlling Damping Off
Damping off may not be able to be prevented, but there are several easy and highly effective methods to control the outbreaks which will greatly lessen the severity of your seedling losses.
For seeds, the easiest method to control seed borne diseases is to source your seeds from a reputable, knowledgeable and experienced seed company or person. Don’t be afraid to ask questions and listen to the answers. An experienced company, grower or garden club member will be able to easily tell you what measures they take, for what varieties and why. If you are sourcing seeds from a local grower or garden club member, it will be very easy to ask around and determine their reputation.
For soil, the easiest and most proven method is simply starting with fresh, sterilized seed starting mix from established and trusted sources. There are a number of bagged seed starting mixes in gardening centers and big box stores, and often some reputable local sources. Simply buying a fresh bag, bringing it home and dumping it into your old faithful seeding tub is not the answer – you might have just infected the fresh soil! First you absolutely must thoroughly clean and sanitize all of your seed starting tools, otherwise you’ve only infected new material and brought the problem into a new season.
After cleaning and removing all of the soil residue, wash with warm soapy water, rinse well then soak in a weak bleach solution – 2 Tablespoons of bleach in a gallon of water and keep the surface wet for 5 minutes. Soaking hand tools such as trowels, hand hoes and such in a small bucket is the easiest, while spraying the potting bench and sink or mixing container works well. Spray as needed to keep the surfaces wet, then let air dry. After sanitizing, you are ready to open the bag of fresh seed starting mix and let the magic of another season of gardening begin!
A good seed starting mix will not only be sterile, but drain well and ideally have a little nutrition for the young seedlings so they won’t need transplanting right after they sprout. You can mix your own or buy a bagged mix from your local garden center or big box store. If you are interested in mixing your own, Seed Starting Media for the Home Gardener will show you what the different ingredients are and what they do.
Practical Tips
There are a couple of tools a home gardener has in their day to day gardening to minimize the chance of damaging fungi getting a toehold in the seed beds.
The easiest, most overlooked and most important is to avoid over-watering. If you notice, two of the three damping off fungi thrive in damp, over-wet conditions. This one mistake is responsible for most of the gardening woes today, both in the seed starting trays and the garden itself. It is best to bottom water seedlings using a standard seed starting tray and wicking seed starting pots. Paper pots have excellent wicking capacity, are easy to make and give the gardener control of how long the pot will last by how many wraps of paper are used to make the pot. Let the water sit for no longer than 20 – 30 minutes, then drain to avoid an over-wet situation. Water 2 or 3 times a day if needed to keep the soil moist during sprouting.
Over-seeding or overcrowding of seedlings creates a favorable environment for destructive fungi to flourish, so give the seedlings room to grow. If needed, thin the weakest seedlings in a starting pot or seedling tray with snips, not by pulling them out. Pulling the seedlings out disturbs and damages adjacent roots and causes more problems down the road. Planting fewer seeds in a pot or seed tray cell will lessen the amount of thinning greatly.
Air movement can significantly reduce the activity of the fungi, as a fan moving air helps to slightly dry the surface of the soil/seedling interface, making it harder for the fungi to get established. This works best in combination with carefully monitoring the soil moisture.
Daily observation is another easy to do, yet often overlooked tool. Catching the fungi in action early gives you a better chance to take corrective action and save more seedlings from an early death. Get in the habit of spending a few minutes just looking at the seedling trays, looking at all of the minute details and getting very familiar with what “normal” looks like. Then compare that each successive day to see if something looks out of place or not right.
Treatment of Damping Off
Now that you’ve got the knowledge and tools to minimize the chance of damping off happening, let’s look at some treatment options if and when it does show its ugly head.
Chamomile is one of the oldest treatments and is one of the gentlest to try first. It is high in sulfur and is a mild fungicide. Make a strong tea with 3 tea bags steeped for at least 20 minutes, then mist on the seedlings once cool.
Cinnamon is a potent natural fungicide that should only be used once. Lightly sprinkle infected soil with finely ground fresh cinnamon if the chamomile doesn’t work in the first day.
Canadian gardening guru Doug Green has found that homemade garlic spray is also very effective against damping off, as garlic is a potent anti-fungal. To make, crush or blend several garlic cloves into a quart of water, then simmer over low heat until the garlic is softened and the essential oils are released. Cool and strain, then spray on the seedlings, making sure to get the stems. If using as a soil drench, straining isn’t as needed.
Now that you’ve got the knowledge to be pro-active in controlling damping off, as well as some tips and tools to treat it when it shows up, you should have a great start to a prolific garden this year!


How long do you use the garlic spray?
Nila – until the damping off starts to decrease or is gone.