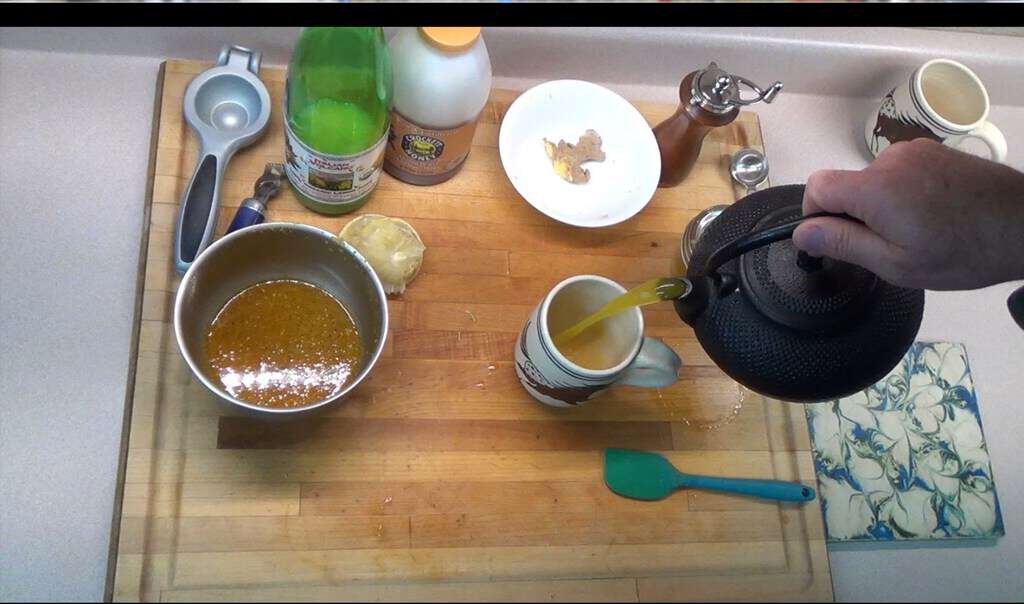
What happens when you combine the traditional honey and lemon juice sore throat or cold remedy with the powerful benefits of ginger and turmeric? You get an easy to make and highly effective cold killer! Stephen shows how to make it in just a few minutes:
This is the basis of a very flexible recipe. You can add chile powder for sinus issues and to boost the cold and flu fighting power or garlic for more benefits.
Easy to make and highly effective, this recipe combines honey, lemon juice, ginger and turmeric to help you feel better fast. This will make two servings - save the second in the refrigerator for just before bedtime.
Servings: 2
Ingredients
1/2cuphoney - preferably rawunfiltered and as local as possible
1/2cuplemon juice - fresh squeezed is best
Zest from one lemon
1 - 2tablespoonsfresh grated ginger
1 - 1 1/2tablespoonsground turmeric
Fresh ground black pepper
Instructions
Mix all ingredients together
Heat enough water for a couple of cups of tea
Add half of mixture to tea strainer, steep in hot water for 4 - 6 minutes
Remove strainer with ginger pulp, or let steep for another 5 minutes then remove
Fermented chile paste is one of my favorite toppings or condiments: I use it on eggs, sandwiches, in soups, stews and of course stir-frys. Most of the chile pastes found in Asian markets will be fermented to some degree, with those made in America less so. Fermenting your own puts you in the driver’s seat, as you get to choose what flavors go into the process and how hot or mild the result is. After you’ve made a batch or two, you’ll reach for your ‘special sauce’ before anything else!
We’ve just made a different type of fermented chile paste and wanted to share the process with you. This is completely different than our other chile fermentation recipe – Fermented Pepper Sauce. This method is still a lacto-fermentation, but instead of depending on the natural lactobacillus bacteria on the chiles, it uses organic whole milk yogurt to jump-start the fermentation process. What we’ve found is that this method really adds to the complexity and roundness of the flavors while decreasing the heat considerably. This is so delicious that a small dollop goes well on top of real vanilla ice cream!
This is a very quick recipe – our fermented chile paste was finished in just about 4 – 5 days, instead of a couple of weeks to a month for the more traditional lacto-fermentation. We hardly saw any bubbling in the air pockets, with none on top. Because of the yogurt culture providing the fermentation engine, we didn’t need to cover the chile mixture with water and then strain it out later.
The chiles we used were heirloom Anaheim and Serrano chiles, with only about 10% being Serranos. I used the Anaheims for the mildness and well-rounded flavors, with the Serranos, providing a different flavor dimension and some good heat. I just cut the stems off of the Anaheims, but seeded, de-veined and de-stemmed the Serranos and the initial mixture was still pretty shockingly hot! The heat was an immediate, front-of-the-tongue heat which is typical for Serranos. The initial odor was unmistakably sharp fresh chiles and garlic, but after one day it smoothed out and had a very pleasant odor. After two days it started to smell very mellow with sauerkraut overtones and the chile/garlic combination fading. When it was finished the two odors were pretty well balanced, with the flavor being remarkably smooth, rich and long lasting. The heat had really mellowed, to a very moderate background that never intruded or was uncomfortable, only adding to the experience.
A very quick and unusual fermentation that uses yogurt to start the fermentation. Absolutely delicious, the chiles heat is greatly moderated by the fermenting process, adding complexity and a great depth of flavor.
Ingredients
1/4cuporganic whole milk yogurtyou want as many live cultures as possible!
1 - 3Tbspnatural saltsuch as Redmond RealSalt or Himalayan salt
2 - 3clovesgarlicor for more garlic flavor - use the whole head
2 - 3quartsfresh chilesany type you prefer
1/2galloncanning jar for the fermentation
1quartjar for storage
-OPTIONAL INGREDIENTS-
1 - 2ozpiece of ginger
Fresh lemongrass stalks - chopped - use the bottom parts that are more tender
1 - 2TspOrganic sugar
1 - 2TbspThai or Vietnamese fish sauce
Instructions
Make sure the fermentation jar is extremely clean - wash with very hot soapy water and rinse very well.
Wash, de-stem the chiles, removing seeds and veins if you want. Remove any bad spots. The seeds and veins contain the capsaicin, or heat. Milder chiles won't add much heat, but hotter ones will. I usually remove the seeds and stems from the really hot chiles for a better flavor that more people can enjoy.
Peel garlic cloves.
Add chiles, garlic and ginger or lemongrass pieces to food processor. Pulse until finely chopped into a paste. Use your judgement as to how fine of a paste to form. Stop and scrape the bowl down to make sure everything is chopped well. If the mixture gets thick and won't move in the bowl, add 1/4 cup water to make it looser.
Add salt - if processor is full, add 3 Tbsp, if over half full, add 2 Tbsp and if half full, add 1 Tbsp.
Add yogurt and pulse again to mix in.
Transfer the paste to the 1/2 gallon jar for fermenting. Replace the screw lid loosely, to keep insects out but allow pressure build up to vent.
Place the jar where you can observe it daily while it ferments, but not in the refrigerator yet.
Daily, remove the lid, stir, smell and taste the mixture. You will see some bubbles and possibly some mold forming. White mold is good - do not be worried with white mold! Any other color is cause for concern - usually due to jar not being extremely clean or chiles not thoroughly washed. Stir any white mold into mixture.
Store in refrigerator to slow down fermentation and enjoy!
Recipe Notes
When the flavors are to your liking, it is done. If left alone, the fermentation will continue for a month or more, so don't feel you have to wait on it. Make sure that you have at least one full inch of headspace between the top of the chile paste and the lid, otherwise it can bubble over and make a mess.
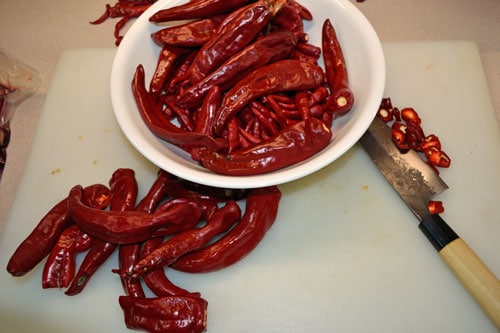
Ripe Chiles for Fermented Chile Paste
We started with fully ripe heirloom Anaheim and Serrano chiles – the Anaheims for flavor with the Serranos providing a nice heat.
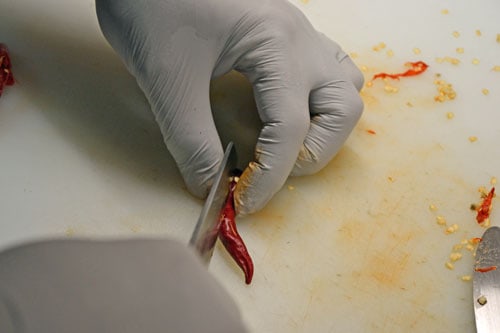
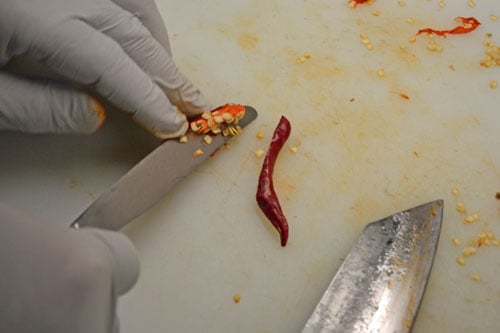
Removing Seeds and Veins from Chiles
The next step was to remove the ‘heat’ from the Serrano chiles by removing the veins and seeds. These contain the capsaicin which is a yellow oil in the seeds and along the veins.
Deseeding Chiles
A butter knife worked well to slip into the chile and remove seeds and veins all at once. Note the disposable gloves to protect my hands now and eyes later!
Chile Paste Ready for Fermenting
After the chiles and garlic were chopped up in the food processor, the yogurt and salt were added, then pulsed to mix in well. Be careful when pushing the chile mixture down to keep your face away from the opening, as it can be quite pungent, depending on your chile selection!
Transferring Chile Paste to Jar
After the yogurt and salt are added, the chile mixture is transferred to the fermenting jar. We started with the quart jar, but it was too full so we transferred to a half gallon to give it enough space.
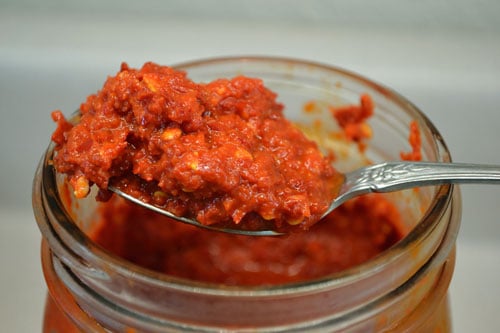
Fermented Chile Paste
After about 5 days, the fermented chile paste was ready to go. It started to mellow in the aroma after the 2nd day, and by the 4th it had a sauerkraut odor with undertones of chile – surprisingly delicious! We transferred the paste back into a quart jar to store in the refrigerator.
Peceto Asado con Tallerines (Argentine Beef Roast with Fettuccine)
Argentina is world-famous for the beef they raise on the open grassland plains of the Pampas. It isn’t surprising to see how creative they are with using beef in so many different ways, much like the Italians have finely crafted the myriad uses of pork in their cuisine.
To expand my cuisine beyond the beloved Mexican and Central American dishes that I’ve grown up with, I wanted to try something a little different but delicious. This beef roast is the first result of our experimentation, and it turned out as succulent and mouthwatering as the photos show. There was a breadth and depth to the flavors that was hard to describe – the roast was tender, juicy and had a number of flavor combinations that kept hitting the tongue, then the tomato sauce balanced the roast out beautifully.
We used a large roast to give us some for an easy, creative dinner or two during the week. Scroll past the recipe for more photos and commentary!
Peceto Asado con Tallarines (Argentine Beef Roast with Fettuccine)
Prep Time
30mins
Cook Time
1hr15mins
Total Time
1hr45mins
This unusual but delicious Argentine roasted beef dish is served with "tuco" - a traditional tomato sauce over tallarines, similar to handmade fettuccine. The marinade and mesquite charcoal roasting gives it an unbelievable depth of flavor.
Servings: 8
Author: Maria Teresa Endara Aliaga Vierci
Ingredients
Roast
1Beef roastabout 4 lbs
1Head of garlicpeeled and crushed or diced
1/3Cupolive oil
1Tspsalt
1Tspfresh ground black pepper
2Tbsfresh rosemaryfinely diced
1/2Cupred wine or water
8Cupscooked fettuccinelinguine or spaghetti
Juice of 1 freshly squeezed lemon and orange
For the Tuco (Tomato sauce)
1/3Cupolive oil
1Medium onionchopped
1Bell pepper - yellow or red preferredchopped
2Large tomatoeschopped or 1 can of chopped tomato puree
1Cupwell-seasoned beef broth
2Dried bay leaves
2TspMexican oregano
Sea salt to taste
Instructions
Marinating the beef
Trim any excess fat from the roast.
In a mortar, mash the garlic into a paste, then lightly crush the rosemary leaves. Mix with the oil, salt and pepper forming a paste. Rub into the roast; cover with plastic wrap and refrigerate overnight.
2 - 3 hours before roasting, remove plastic wrap, place in bowl and pour lemon and orange juice over roast.
Roasting
It is best to roast over mesquite charcoal for the absolute best flavor, but oven roasting will still be very tasty.
Heat covered charcoal grill to around 325°F and roast over the coals for 10 - 15 minutes each side to sear and seal the juices in. After 30 minutes, place roast in a shallow roasting pan on a pizza stone to finish roasting over an indirect heat. Turn every 20 minutes until tender.
If roasting in oven, start with roast in shallow pan and turn and bast every 20 minutes.
Once roast is tender, remove from heat and let sit for 10 minutes then slice thinly across the grain.
Prepare the Tuco
Heat the oil in a heavy bottomed skillet over medium heat.
Saute the onions until soft, add the bell pepper and saute until just beginning to soften.
Add the tomatoes and cook uncovered until they release their juices, stirring consistently as the juices evaporate a bit.
Add the beef broth, bay leaves, Mexican oregano. Bring to a boil, then reduce heat to a simmer.
Simmer for 10 - 15 minutes until slightly thickened and season to taste with salt.
Set aside to serve with noodles.
Serving
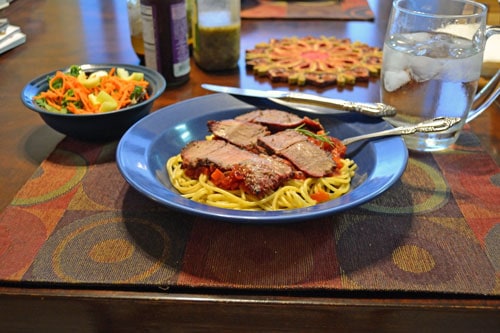
Arrange warm noodles on the plate, ladle a generous helping of tuco on the noodles and layer with 3 or more slices of roast on top.
Garnish with a sprig of rosemary if desired.
Recipe Notes
This is a great way to cook a large portion of roast for a scrumptious Sunday dinner to have the basis of several outstanding meals during the week.
Here is what dinner started with. The beef is locally grown, semi-grassfed from a neighbor. I call it semi-grassfed as we simply don’t have enough grass in central Arizona on smaller acreage to completely feed a large animal like a beef cow. We do know exactly how this beef was raised and the processor is local as well. This beef traveled less than 20 miles from hoof to plate!
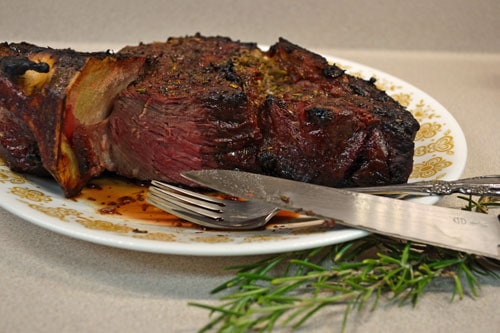
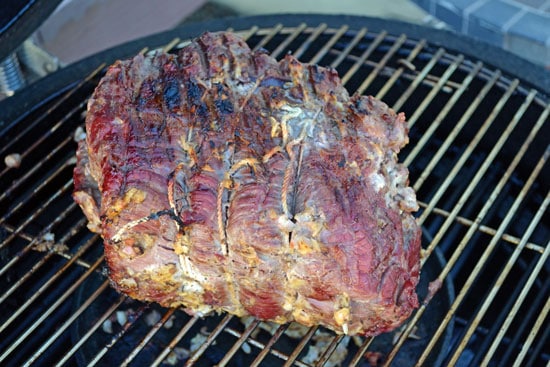
After just over an hour, this is the beauty that emerged from our Kamado, a Japanese charcoal smoker/cooker. The deep red is from the mesquite smoke, and the taste test that I cut off is apparent. Delicious!
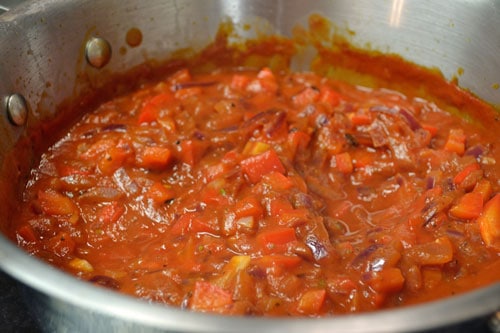
The tuco sauce close-up. It was a different experience making a non-Italian tomato sauce! It was rich, flavorful and a perfect counter to the intense flavors of the roasted beef.
This smoked, yogurt marinated beef roast was served for Cindy’s birthday dinner, where I wanted to do something very tasty, a bit unusual and didn’t require hovering over the stove in the kitchen for a long time, as we were busy with catching up in the office after two successive weekends presenting at gardening shows.
We are fortunate to have some locally raised beef that is delicious in its own right, so that made a perfect base on which to build. I was perusing one of the newer issues of Saveur magazine and came across the dessert idea – a baked yogurt tart – and saw the recipe for grilled yogurt marinated lamb chops. This is our version, slow roasted and smoked over mesquite charcoal in a Kamado, or Japanese ceramic grill. I roasted this at about 300°F for just a bit over 2 hours, as grass-fed beef shouldn’t be cooked as long as conventionally raised beef roast.
The results were fabulous – the beef roast had a rich, smoky beef flavor that is missing in store bought beef, followed by the tangy, complex flavors of the marinade. Prepare this in the morning and roast it in the afternoon, planning about 2 – 3 hours for the roasting, depending on the size of your roast.
This is the perfect centerpiece for an impressive and delicious dinner that won’t take all of your day to prepare!
Scroll down after the recipe for photos showing the process.
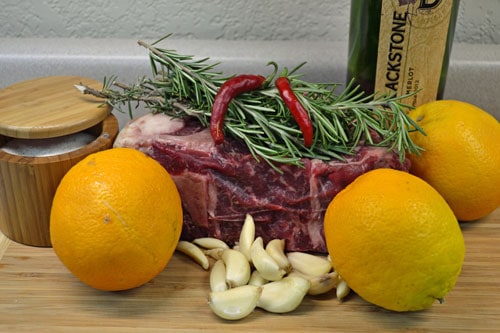
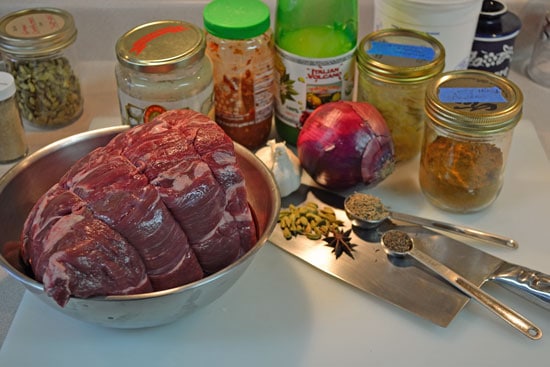
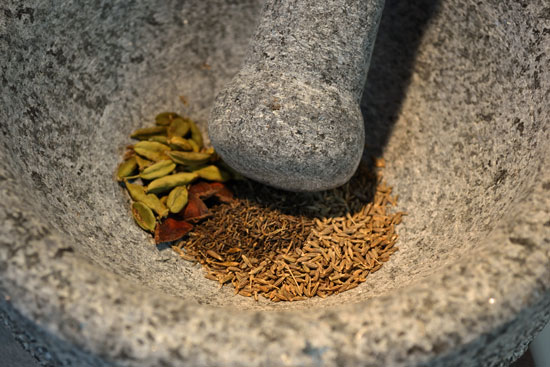
Here’s what could come out of your garden for this recipe – Onion and Cumin, along with garlic you’ve grown!
Grind cumin, green cardamom, caraway, star anise in a mortar and pestle. Add to mixing bowl with yogurt.
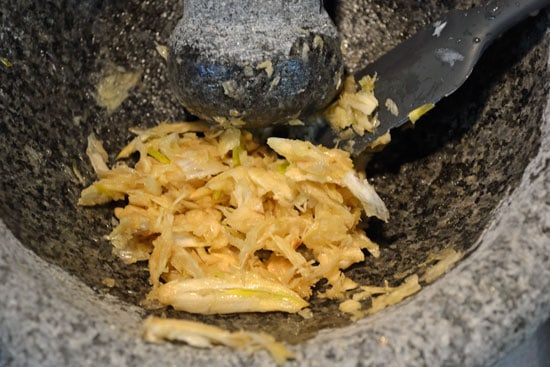
Peel and crush garlic into a paste in mortar and pestle.
Stir yogurt, freshly ground spices, garlic paste, zest and lemon juice in a bowl.
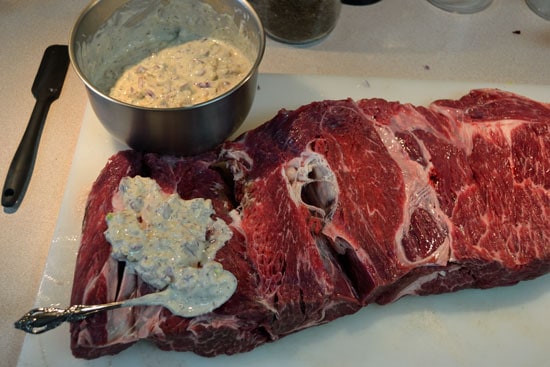
Butterfly beef roast in a circular cut about 1 inch thick, lay open and spoon yogurt marinade over, leaving a small amount for the outside.
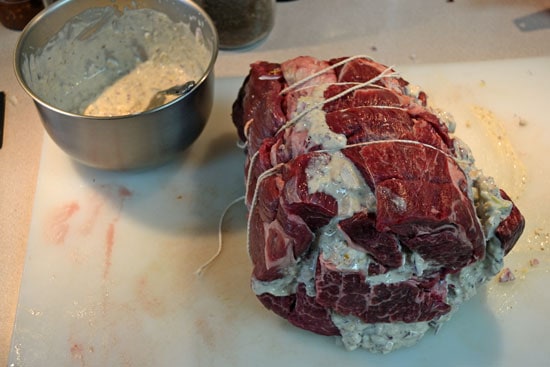
Roll up and tie with butcher's twine, spoon remainder of marinade on outside.
Cover with foil, marinade for 4 hours in refrigerator.
Heat charcoal or covered gas grill to medium. 300°F is target temperature. Once temperature is stabilized, roast beef for 2 - 2 1/2 hours, turning once each hour.
Roast until desired doneness, then remove and let sit on platter for 5 - 10 minutes. Slice and serve.
Recipe Notes
Grass-fed beef will be tough and chewy if cooked to the usual USDA temperatures most of us are used to. The USDA recommends the beef be cooked to 145 - 170°F, while 120 - 140°F is best for pastured or grass-fed beef. Shannon Hayes at www.grassfedcooking.com has taught me the most about bringing the rich and delicious flavors from these meats!
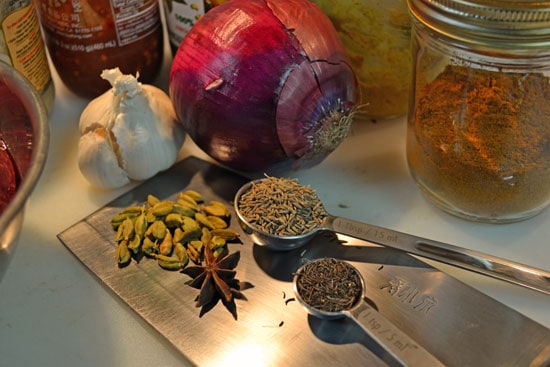
A close-up view of the spices. I actually didn’t use all of them, but had gathered them when doing the brainstorming and adaptation of the original recipe.
I prefer to hand grind my spices when I have the time, the flavor is much better, more defined and richer than with a blender or mechanical spice grinder. The crushing and twisting motion really does make a difference. We also found this applies to the flavors of pesto!
There is green cardamom, star anise, caraway and cumin seeds in there.
During the grinding process, the most amazing aromas drift up. Cindy had come in and commented on how wonderful it smelled already, and I was only grinding the spices! I ground the cardamom pods whole to begin with, then pulled the shells out after crushing them a bit to release their flavors.
Next up was the garlic. I used the “Peel Garlic in 10 Seconds” trick, this time for the whole head. It still only took me maybe 15 seconds! The reason for grinding it instead of dicing or chopping it is to release the oils and flavors that only crushing or grinding will achieve.
After mixing the marinade and butterflying the roast into about an inch thick roll, I applied the marinade and wrapped it back up.
After liberally spooning the marinade on the inside and rolling it back up, I tied it with butcher’s twine, spooned the remainder of the marinade on the outside, put it into a bowl and then into the refrigerator for 4 – 5 hours to do it’s magic!
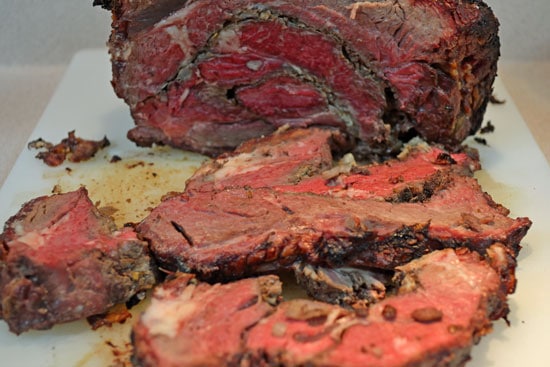
That afternoon I fired the Kamado up and once the temperature stabilized, the roast went on. I had spread the coals to the outside and put a small round cast iron griddle underneath to divert the heat to be more indirect. Once the internal temperature was 125°F in the center, it was ready to let rest and then slice. Beautiful and mouthwateringly aromatic!
It was hard to walk down wind of the smoker without popping the lid every time to check on it!
Once it had rested for 5 – 10 minutes, I sliced it and we dug in. Of the 4 – 6 pound roast, 3 of us ate only about 1/4 of it, so there will be a number of other tasty dishes that result from this one.
Can you peel garlic in 10 seconds? Not just one clove, but a handful or even a whole head? Can you do 5 or 10 in a row?
Sure you can, we show you how in our very short video! Extremely simple, works every time and completely eliminates the mess, fuss and frustration of peeling garlic.
A couple of tips- if the garlic isn’t quite as peeled as you need, simply shake it a little bit more. If it comes out looking a little crushed, just shake a little less next time. With just a couple of minutes of practice, you’ll be peeling garlic like a pro and will never hesitate to use fresh garlic in your cooking again.
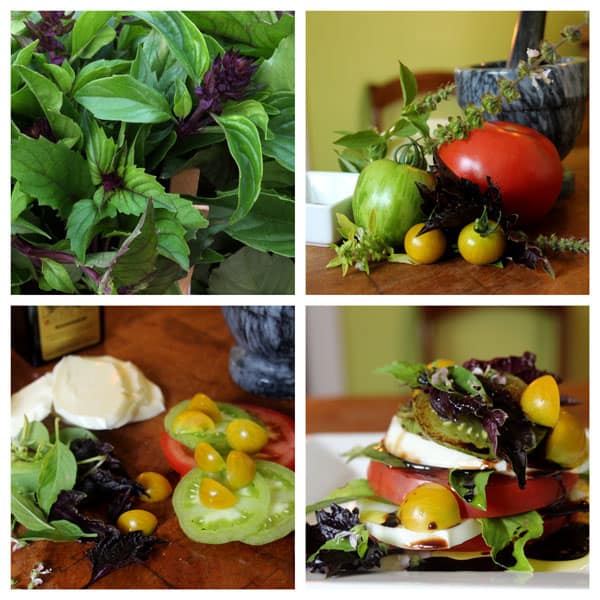
The intense aroma of fresh basil is one of the hallmarks of summer and a garden in the full swing of production. The Greek name for basil – βασιλικός – also translates as “royal”, showing the regard that it has had for a long time. It is also a symbol of love in Italy, where it is used generously in many dishes.
For the absolute best aroma and flavor, basil must be used fresh – the fresher the better. Luckily for us, it can be preserved through several different methods and brought out in the depths of winter to remind us of what summer was.
The easiest way is to freeze or dry the leaves. To freeze, just puree the leaves with a little water to a thick consistency and put into ice cube trays. When completely frozen, pop out into a gallon sized Zip-lock bag and store in the freezer until ready to use. They will brighten up soups, sauces and can be used to make a very tasty tapenade. Drying the leaves reduces the fresh aroma, but keeps most of the flavors for soups, stews and sauces. Make sure that they are dried to a brittle stage to avoid any moisture that can spoil the leaves in storage. Use sparingly when dried, as they rehydrate and can overpower milder sauces.
Yet another method to preserve those delicious summer-fresh flavors is to make pesto and freeze it, either in ice cube trays or in 6 – 8 ounce containers. It won’t have quite all of the punch of fresh pesto, but is mighty close when you are longing for the fresh flavors of summer! Read further for a traditional Pesto alla Genoves recipe, along with a video demonstration from Slow Food Terra Madre last October in Turin, Italy.
When you are absolutely overrun with basil, consider making herb-infused vinegar with basil, rosemary, thyme, marjoram or any combination for beautiful, thoughtful and highly tasty gifts. Just half fill a one gallon glass jar with air-dried herbs (leaves and stems, everything but the roots) and fill with almost boiling vinegar. High quality vinegar will give a better flavor; consider using apple cider or rice vinegar for great flavors. Cover loosely with a lid and let the herbs steep for at least one month or more. Taste occasionally to see when the flavors have developed to your taste, then strain the vinegar through cheesecloth and fill a decorative bottle.
Mention basil and immediately pesto comes to mind. Exactly when the combination of basil, cheese, garlic and pine nuts came to be is uncertain, but we do know that the Romans ate a paste of crushed cheese, garlic and herbs that was called moretum. The first recipe that we know of is from 1863 in La Cuciniera Genovese written by Giovanni Battista Ratto, so this delicacy has captivated us for quite some time!
Here is the classic Pesto alla Genovese followed by a video demonstration that we filmed at Slow Food Terra Madre in Turin, Italy in late October 2012.
This is the time honored, traditional method that really does yield a superior flavor, if you have the mortar and pestle and the time.
Wash the basil, pulling all the leaves off, and put them in a colander.
Start the crushing process with the garlic, pine nuts and a pinch of sea salt.
When a paste has formed, add the basil with another dash of sea salt. The rule of thumb is a clove of garlic per thirty leaves of basil, but you don’t have to count the leaves!
Gently roll the pestle against the mortar walls, shredding the leaves.
As soon as basil juice starts to form in the bottom of the mortar, it’s time to add the two grated cheeses to the mixture and continue to stir until a nice green paste is formed. After a few minutes a smooth, consistent paste will be formed and you will have the tastiest pesto!
With a food processor:
Purists will cry foul at this, but with care a food processor can give you very good results. It may take some experimenting to create a truly memorable pesto, but it is worth it.
To avoid spoiling the pesto flavor by the food processor, take care to minimize the heat produced by the blade.
Chill the blade and bowl assembly in the freezer before starting and monitor the amount of time the pesto is being processed.
Using cheese fresh from the refrigerator helps control any heat as well.
You’ll want to stop the processor three or four times to scrape the pesto from the sides with a spatula.
You are looking for a bright green, smooth consistency. When that is achieved, stop.
Serves 4 – 6
To see how pesto is made in the traditional, handmade method, watch this video we shot at Slow Food Terra Madre last October.
The following best-practice rules and delicious recipe are courtesy of Farm Fresh Now!, a project of The Land Connection, an educational nonprofit that preserves farmland, trains new farmers, and connects people with great locally-grown foods. This series is made possible with generous support from the Illinois Department of Agriculture.
The best way to enjoy healthy, seasonal produce is to buy it from your local community farmer. To locate the farmers’ market or CSA nearest you, visit Local Harvest.
Basil Rules
Ahhh, basil! Even the word carries a whiff of its invigorating scent.
But it’s the aromatic leaves themselves that contain dozens of volatile essential oils. Their relative concentration is the difference between “regular” Genovese basil, Thai basil, Lemon basil, Holy Basil, Cinnamon Basil, African Basil and all the other basils you’ll find your local farmer growing.
There are a few rules to remember when buying and using basil.
Rule #1: Use only the freshest basil. The fresher it is, the better it is. The fragrance of basil is never as seductive as when it is first plucked from a live plant and eaten raw, as quickly as possible after plucking. This is why you should think about having a pot of basil of your own – on the kitchen window sill or in your back yard. The next best thing is to get basil from a local farmer at a Farmer’s Market or through a CSA.
Rule #2: Don’t cook basil – don’t even heat it up if you can help it. When adding basil to a pasta sauce or a pizza, do so only at the last minute, while tossing with the pasta or after the pizza has emerged from the oven. Basil pesto too, should always be used raw, never warmed up or cooked.
Rule #3: Stay away from knives. The cut edges of basil will blacken and the overall flavor will be diminished. Instead, simply use whole leaves or tear large leaves into small pieces with your hands before scattering them over a tomato salad, mashing them into a basil butter for corn on the cob, sprinkling on green bean salads, or roasted eggplant, zucchini, or peppers. For more summer fun, experiment with the many scented and colored basils that farmers are now bringing to market, including lemon, anise, Thai, cinnamon, and purple basils.
Rule #4: Use basil only in the summer. This relates back to Rule #1, bringing us full circle. Basil is the ultimate summer herb. Its rich perfume evokes warm sunny days and mouthwatering combinations with other summer vegetables – tomatoes, zucchini, peppers. Sure, you can get it year-round in the grocery store, but like tomatoes, basil tends to be insipid when grown in a greenhouse or flown in from California. Some things in life are definitely worth the wait. Basil is one of them.
Preserving that overly abundant harvest has been one of the major challenges that gardening and agriculture has always had. In today’s world we are much more familiar with the processes of canning, drying and freezing as acceptable methods of preserving our garden’s harvest for the winter season and longer. These methods have their own set of challenges, though. Canning requires time, experience and knowledge to be successful. Freezing is pretty simple, but has its own set of needs to ensure the garden bounty isn’t lost to freezer burn or premature thawing. Drying is also simple, but benefits from modern drying equipment that can be expensive as an initial purchase.
What if there was another way, a method of preserving the harvest that is not only simple, non-intensive for both labor and equipment and was proven safe? One that is location and temperature independent, doesn’t care if you forget the exact timing and still produces an absolutely delicious product? There is! That method is fermentation. It has been proven safe over several thousand years, with at least that many different approaches and many more recipes. Almost every culture across history has contributed something to the art of fermentation.
Fermenting vegetables is an extremely simple, effective and tasty way to start experimenting and gaining knowledge, taste and experience. In addition to being easy and quick it is also highly nutritious and beneficial to your health.
Some folks are hesitant or outright afraid of trying fermentation for fear of accidentally growing the “wrong” bacteria and sickening or even killing themselves or their families. This is completely understandable in today’s world of anti-microbial soaps, detergents and wipes.
At least in the world of raw vegetables, this fear is unfounded. “As far as I know, there has never been a documented case of food-borne illness from fermented vegetables. Risky is not a word I would use to describe vegetable fermentation. It is one of the oldest and safest technologies we have.” This is from Fred Breidt, a USDA microbiologist specializing in vegetable fermentation.
In fact, fermenting commercially available vegetables will kill any pathogens that we’ve seen in the news as contributing to food-borne illnesses, as they simply cannot survive in the lactic acid environments of fermentation!
This is going to be a slightly different recipe format than we usually do. We will give you a foundational approach to fermenting any vegetables, and then give a basic recipe for a sweet and hot fermented pepper sauce or paste. The beauty of these recipes is that they are entirely scalable. Do you have an extra quart of hot chiles, a handful of sweet peppers and some garlic or onion? Great, we can work with that! Or do you have a couple of 5 gallon buckets of hot chiles and 3 more of sweet peppers, more onions than you know what to do with and you’re worried about them all going bad? No worries, we can work with that as well – all from the same recipe! The flavors from each recipe will be different, but equally delicious and nutritious.
There is a new book on fermentation on the market, and it is most excellent. The Art of Fermentation by Sandor Katz is his newest exploration of this ancient form of preserving foods. His tagline on the book reads, “An in-depth exploration of essential concepts and processes from around the world.” The basic concepts of fermenting come right out of his book, and they are easy!
Vegetable Fermentation Made Easy
Chop or grate vegetables.
Lightly salt the chopped veggies (add more as necessary for taste) and pound or squeeze until moist; alternatively, soak the veggies in a brine solution for a few hours.
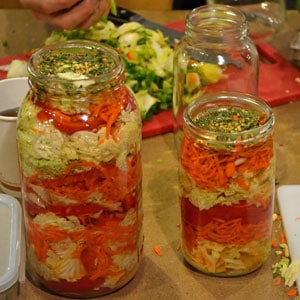
Pack the vegetables into a jar or other vessel, tightly, so that they are forced below the liquid. Add water, if necessary.
Wait, taste frequently, and enjoy!
It doesn’t matter if you have one or a dozen veggies, the above recipe works. Add spices, herbs or edible flowers and experiment. You will be surprised at just how tasty almost everything comes out.
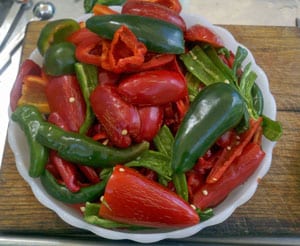
Now that we have the basics down, let’s look at how to handle that bumper crop of hot chiles and sweet peppers. These, along with tomatoes, are one of the most expensive vegetables to buy in the store, but taste so much better out of your garden. It is an absolute crying shame to let any of these go to waste!
Let’s look first at a hot fermented chile sauce, much like Sri Ra Cha or “Rooster Sauce” as it’s called after the rooster on the bottle. The only ingredient ratio to keep in mind is the chile to garlic. Don’t go crazy on the garlic, as it gains pungency as it ferments and can throw off the overall flavor.
A note on the salt – use anything but Iodized salt, as this will cloud the color of the brine and can leave a metallic aftertaste.
Optional: 1/4 Cup fish sauce in place of vinegar. Use Vietnamese for a stronger flavor or Thai for a milder one.
Optional: Tapioca starch for thickening
Remove the stems from the chiles, leaving the green “cap” where the stem meets the chile. It adds a unique flavor during fermentation.
Chop the chiles and garlic lightly, using a food processor if needed until mixture is largely chunky. Do not process too much, just minimally.
Add chile mixture to a half-gallon Mason jar or other non-metal container. Sprinkle salt in while packing chiles. Pack down with a wooden spoon or spatula. Add just enough water to submerge mixture and cover with a dish towel secured by the ring.
Ferment for a month, more or less as taste dictates. Taste about every week to see when it is “done” for your tastes. You will see how the flavor changes with time. Keep chile mixture submerged and remove any mold that forms on top by lifting it out with a spoon, fork or spatula.
When the fermentation is finished, liquefy in a blender or food processor. Strain out the seeds and pulp with a cheese-making cloth and let hang for a few hours or squeeze to get all the liquid out. Discard the pulp and seeds. Heat the liquid on low heat, adding the sugar and vinegar or fish sauce and stirring them in.
Once the sugar, vinegar or fish sauce are melted in you can lower the heat and reduce the sauce to the consistency you like or use a little tapioca starch to thicken it, much like using corn starch. Tapioca will add just a touch of sweetness, won’t be bitter and is GMO free. Let cool and bottle.
Store in the refrigerator.
Will keep for 6 months or more, but you’ll eat it long before then!
Recipe notes: Wait until the chiles are fully ripe and red, as they will have the most complex flavor profile and yield the tastiest sauce.
Use the general ratio listed to scale up or down to suit your particular needs at the time.
Now let’s look at a larger batch with more ingredients and a completely different flavor.
Sweet and Spicy Fermented Pepper Sauce
3 Lbs Ripe red chiles, much the same as above
1 Lb Ripe sweet bell peppers – Jupiter, Melrose, or Lipstick
1/4 Cup apple cider vinegar or fish sauce for additional flavor
The procedure is much the same as for the above recipe. Chop the chiles, sweet peppers, garlic and onion.
Submerse in a suitable container, pack down with a wooden spoon and cover with water. If using a large, open container it may help to use a plate on the top weighted down with one or two heavy-duty freezer Zip-lock bags filled with a brine solution of 3 Tbs salt to 1/2 gallon water. This way if the bags do spring a leak, you don’t dilute the brine of the fermentation. This also allows the bubbles to get past the plate and bags without building up pressure.
Ferment for a month, tasting weekly.
Liquefy in a blender, strain out the pulp and seeds.
Heat on low and add sugar and vinegar or fish sauce.
Thicken if desired.
Enjoy!
Now you have the basic foundation of how to make some incredibly delicious chile or sweet fermented pepper sauce. You can go from mild to shockingly hot and experiment with different spices and amounts of complementary vegetables to add their flavors. You will quickly become something of a hero to your family and friends once they taste your unique sauces!
One of my favorite Mexican cookbooks is titled Seasons of My Heart, by Susana Trilling. Susana was a chef and owner of a restaurant in New York City and also owned a very successful catering business. She left all of this to pursue her ethnic roots in Mexico around Oaxaca, sharing the food, culture and traditions of the cooking of the region. She wrote this cookbook to showcase the native foods that are not well known outside the region. Seasons of My Hearthas become hard to find but is well worth pursuing once you do find it.
Today I’m going to share a recipe called Albóndigas, or meatball soup. Many people are familiar with Albóndigas as a clear broth with a couple of meatballs in it as an appetizer or first course. This particular soup is more rural in nature, with the broth enriched by the onions and tomato puree. Many people are are amazed to find that this is “Mexican food”, as it doesn’t have the characteristic emphasis on chiles and heat that most Americans are accustomed to seeing in Mexican food. This is one of those perfect hearty winter soups that has an abundance of rich and savory flavors. Make extra, as this soup keeps exceptionally well and will prove to be very popular.
In a medium bowl, mix the ground beef with the pepper, salt, cumin and chili powder.
Shape the mixture into tiny meatballs about the size of black cherries.
In a heavy 4 quart stockpot, heat the oil over medium to high heat and brown the meat balls on all sides, for about 2 minutes, in small batches without crowding them.
Remove from the pan and set aside.
If there is extra oil in the stock pot, remove it, leaving about 2 tablespoons.
Fry the onions and leek until they’re soft over medium heat, 4 to 6 minutes.
Add the garlic and season with the pepper and bay leaves.
And the beef broth, tomato puree, and meatballs.
Lower the heat to a slow simmer, cover, and cook for 1 1/2 hours.
Add the salt, parsley and chives and cook 5 to 10 minutes longer.
Serve with garlic toast.
During the winter months, or cold weather, this is the type of soup that is very easy to make when you’re cooking out of your freezer with ingredients that you have prepared beforehand. Making beef broth or beef stock is somewhat time consuming, but does not require constant attention and can be made in large batches, saving time later on. Likewise, making tomato puree from extra tomatoes when your garden is in the height of production gives you a rich, fresh tomato taste in the dead of winter.
Please give this soup a try, and let us know what you think!
https://underwoodgardens.com/wp-content/uploads/2011/12/SeasonsofmyHeart.jpg475383Stephen Scotthttps://underwoodgardens.com/wp-content/uploads/2019/06/Survey-Header.jpgStephen Scott2011-12-11 18:36:372017-08-14 18:11:53Sopa de Tomate con Albóndigas or Tomato Soup with Meatballs
When Fall arrives, I look forward to thick and hearty soups. Even if the weather isn’t cold and blustery quite yet, a hot bowl of broth-based soup is somehow nourishing for both the body and soul. Serve with fresh cornbread, biscuits or home-baked whole wheat bread and butter, and you’ll understand how family traditions are started. For this soup, I used a beef broth that I’d made earlier this summer with bones from the butcher. We are fortunate to have a real, old-fashioned butcher in our town that understands when I ask for broth bones. Pan roasted with some root vegetables, then slowly simmered for a day and a half- this is a rich, silky broth that has a depth of flavor just not found outside of the home. Well worth the time to make in large batches and frozen until needed!
Using beef, barley and what root vegetables were on hand was the ancient beginning of this soup. You can use any root vegetable that you have, in any combination that you like, and a little or a lot of beef for flavor. Slow simmering for several hours will give the best, richest flavor. Plan on making extra, as this is very popular once people get a taste of it. Great to make on a weekend to have for lunches at the start of the week. This can be a thick or thinner soup, or stew depending on how much liquid you leave at the end of the cooking. Maintain the liquid level for more soup like consistency, or let the barley soak up the liquid for a stew. Feel free to add onion, green beans, peas, beets, celery or any vegetable that will add a hearty flavor to this soup.
Beef, Barley and Root Vegetable Soup
6-8 oz Beef, cubed- Roast is best for flavor in slow cooking
Add beef, broth and thyme, marjoram, savory, rosemary, black pepper, bay leaves and 1/2 of the salt to a heavy pot or stockpot and bring to a slow simmer. Once beef is tender- about 30-45 min for 8 oz- add garlic, carrots and potatoes and taste. Adjust salt if needed and add water to keep covered. Continue simmering for 1 hr or until carrots are tender. Add tomatoes and barley, check liquid level and add water if needed, simmer for 45 min to 1 hr until barley is tender but not soft or mushy. It will have a slight crunchy, toothy texture to it.
An alternative method is to brown the beef in 2-3 Tbs Olive oil or butter on medium heat until well browned and deglaze with 1/2 cup red wine. Lower the heat, then add the broth and spices and continue from that point. This will add a richness from the brown/deglazing, along with the wine. Experiment and you’ll soon learn which is your favorite method and ingredients!
One of the sure signs that Spring is near is the arrival of tender, young Asparagus.
Now I realize that some folks aren’t all that excited about this unusual vegetable, but it is something like Eggplant, or even Brussels Sprouts. Store-bought, it is not that appealing and is often rightly described as insipid. A lot of us grew up with mushy, steamed-to-death stalks of slightly slimy green yuck.
I thought much the same until encountering the young green stalks growing alongside the irrigation ditches as a pre-teen. Sliced off just below ground level to encourage next year’s growth, taken straight home, washed and lightly sauteed in butter before being drenched in eggs with fresh home grown tomato, basil and oregano in a classic frittata, I fell in love with that incredibly fresh, lingering taste of Spring. So much so, in fact, that I have been hesitant to buy asparagus from the store, preferring to get it from the Farmer’s Market or other fresh sources.
I have found that the sautee method keeps the crisp texture while concentrating the fresh taste, while steaming or boiling creates the mushy texture and drains the flavor out.
Here is a different approach to the presentation, that has a medley of fresh flavors that will make it memorable in a positive way!
Melt butter in a heavy skillet over medium heat. Stirring constantly, sautee the garlic and pine nuts in the melted butter until the garlic is fragrant and the nuts just begin to turn brown, about 2 minutes. Stir in the lemon juice.
Add the asparagus and prosciutto to the mixture and toss to mix evenly. Continue to sautee until asparagus is bright green, tender and still just slightly crisp, about 3-5 minutes. Season with salt and pepper; serve hot.
https://underwoodgardens.com/wp-content/uploads/2011/04/Asparagus-with-Prosciutto1.jpg320320Stephen Scotthttps://underwoodgardens.com/wp-content/uploads/2019/06/Survey-Header.jpgStephen Scott2011-04-07 14:50:542015-09-21 14:06:01Young Asparagus with Prosciutto and Pine Nuts
When a friend mentioned the Loofah gourd, I thought of a scrubby for the shower. When he mentioned eating the Loofah, I had to stop and really think for a minute. This is probably the same situation for most of us, as this Asian vegetable is not very well known here for cuisine. We tend to grow them or know them as bath or scrubbing sponges, the result of growing a long green gourd, then drying, peeling, seeding and pounding it to make it soft enough to use as a sponge. Virtually unknown in American kitchens, this very same gourd is harvested young across Asia when it is a tender and adaptable vegetable. It has a porous texture and cucumber-like flavor that lends itself well in dishes that use a sauce base or where it can soak up the other flavors of the dish. Very popular in China, it is steamed, boiled or stir-fried with various ingredients such as garlic, onions or dried- sometimes salted- prawns. In spicy dishes, it is used as a cooling ingredient.
There are two physically different kinds of Loofah. One has ridges on it that must be peeled to remove the sharp ridges before cooking. The second type, which is more common in the US, is round and when small looks like a zucchini. It only needs to be washed and sliced for cooking, though some recipes will call for it to be peeled. Terroir Seeds carries a round Loofah that can be eaten and used as a sponge.
Here are a couple of stir-fried Loofah recipes to get you used to the idea of the Loofah as a food.
Chao Sigua (Stir-Fried Loofah)
This is an extremely simple side dish that is deceptively delicious.
2 Tbsp Peanut oil
4 Cloves garlic, thinly sliced lengthwise
1 Lb. Young Loofah gourd, cut 1/4 inch diagonally, then in 1/4 inch julienned
1 Tbsp Water
1/4 Tsp sugar
Sea salt and freshly ground pepper to taste
Heat large wok or cast iron skillet over high heat, then add oil once wok is hot. Keep heat on high- this cooks in under a minute. Immediately add garlic, stir quickly 10-20 seconds. Add Loofah and water, give a good stir then add salt and pepper, stir again then add sugar. Stir for 30-60 seconds and serve immediately. Do not overcook, more than 60 seconds. The high heat will cook with very little oil and create a very delicious taste.
Stir-Fried Loofah and Chicken
This is another unusual, but delicious Chinese dish that will amaze your guests. Make sure everything is sliced, at hand and ready to be added to the wok, as once the cooking starts you will only have time to add ingredients and stir, as the whole process will take only about 5-7 minutes. I prefer to use a cast iron wok, as it retains the heat better and makes the fast cooking of the Chinese stir-fry much easier. I start cooking the dish when the rice is just finishing up, and both are usually ready about the same time.
1/2 Lb skinless boneless chicken breast, cut across grain into 1/8-inch-thick slices
1 Tsp Sesame oil
2 Tbs Oyster sauce
1 Tbs Soy sauce
1 Tsp Sugar
1/2 Cup Chicken stock or chicken broth
1/2 Lb Young loofah (about 12 inches long). Slice diagonally into 1/4 inch slices, then cut in half. You may peel this if you want, but not needed.
1/8 to 1/4 Cup Peanut oil
3 Small fresh shiitake mushrooms, stems discarded and caps sliced 1/8 inch thick
1 Tsp Chinese fermented black bean sauce
5 Small (2-inch) fresh red chiles such as Thai, seeded and cut into fine julienne (2 Tsp)
2 Tsp Garlic, finely chopped
2 Tsp Fresh Ginger, finely chopped
2 Tsp cornstarch mixed with 2 tablespoons water
Stir chicken, soy sauce, sugar and 1/2 Tsp Sesame oil in a bowl, set aside for 10 minutes. This acts as a quick marinade. If you want, add 1/2 of the chiles to the mix.
Stir Oyster sauce, corn starch, and chicken broth/stock in another bowl, set aside.
Heat dry wok or cast iron skillet on medium-high to high heat. It needs to be just almost smoking before you add the oil. Once you add the oil, you will immediately start cooking and not slow down to get the best flavor and texture. When wok is hot, add Peanut oil, swirl wok to coat sides and immediately add chicken, stirring constantly. Cook for 1-1 1/2 minutes, until no longer pink, but just barely.
Remove chicken with slotted spoon to a bowl and set aside. Increase heat to high, add remainder of oil if needed, swirl wok to coat sides and add mushrooms, cook until lightly browned and tender, stirring constantly. This should be 1-2 minutes. Add black bean sauce, chiles, garlic, and ginger and stir-fry until fragrant, about 30 seconds.
Add loofah and stir to coat, then add Oyster sauce mix and bring to a boil, stirring well. It should boil and start to thicken and turn translucent in 30-45 seconds. Lower heat to low at this point, let Oyster sauce with the cornstarch finish thickening to your liking and serve immediately over sticky rice. Drizzle remaining 1/2 Tsp Sesame oil over dish just before serving.
Today we have a new recipe that will work just about anywhere. I’ve used it when entertaining at home, at a friend’s house when cooking a shared dinner party and even when camping off road in our Land Rover! It lends itself to being cooked outside, which keeps the house cooler, and somehow increases the flavor…
It takes a bit of time, as this is a slow pan roast recipe, but is easy and you can do other prep or cooking while this is roasting. Total cooking time is around 30-45 minutes. Plan extra, as the flavor from the slow roasting is tremendous, and people will go back for more. That’s good, as this is real and healthy food! This is a perfect counterpart to barbecued chicken or burgers on a warm Spring evening. If you increase the vegetables and add warm fresh bread, this can be a light and healthy dinner in itself.
The eggplant must be fresh, as it can be bitter otherwise. Fresh means picked that day. If fresh is not available, leave it out. If you want an extra flavor, don’t peel the eggplant. This is the perfect showcase for fresh grown, heirloom ingredients, as the flavors will really shine. The ingredients are roasted in this order to bring out their flavors, as well as mingle them with the others. It is worth the time to do it in order!
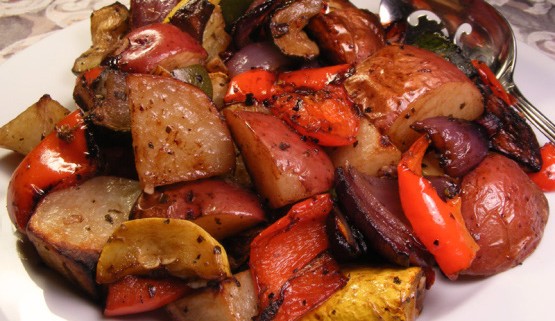
Mediterranean Pan Roasted Vegetables
Serves 4-6
12 oz potatoes, cut into 1/2 inch cubes with skin on (Red potatoes are preferred)
2 bell peppers- any color, cut into 1/2 inch squares
1 medium red onion, diced into 1/2 inch squares
1 small eggplant, peeled and cut into 1/2 squares (Only use fresh eggplant to avoid bitterness)
3 or 4 cloves garlic, sliced
4 Tbsp extra virgin olive oil
2 Tbsp balsamic vinegar
1/2 tsp dried basil
1/2 tsp dried oregano
1/2 tsp fresh chives
1 tsp fresh rosemary, finely chopped
Salt and freshly ground pepper to taste
A large cast iron pan is best, but a heavy bottomed pan that retains heat well will also work.
Heat pan on medium heat, until thoroughly warm. A pan that is not heated all the way through will cause food to stick. Whisk balsamic vinegar, 2 Tbsp olive oil, basil, oregano, chives and 1/2 tsp rosemary together and set aside.
Add 2 Tbsp olive oil to pan, coat pan well and add potatoes, coating with oil in pan. Roast for 10-15 minutes, turning occasionally until they start to soften. Add onion and bell peppers, along with half of the rosemary and roast for 10 minutes, turning as well. Add eggplant and garlic, roasting for 5 minutes. Drizzle herb/oil/vinegar mixture over vegetables, stir well to coat and continue roasting until potatoes are tender, about 10 minutes more. Serve hot or let cool and store in refrigerator for next day to let the flavors set up and mingle.
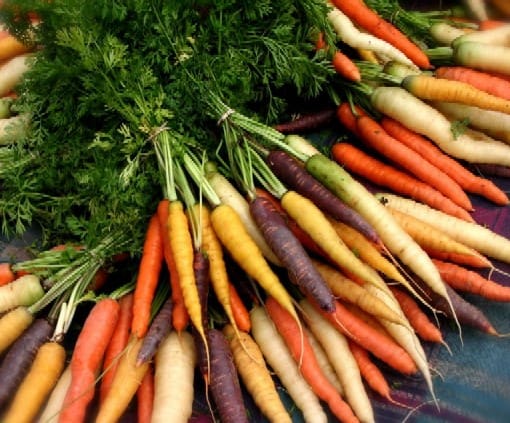
Today’s recipe is a wonderfully different yet tasty way to prepare Heirloom Carrots, but will work equally well with other, similar vegetables, such as celery, bell peppers, beets, radishes or other root crops. The preparation is quick, and done the day before makes a special lunch or dinner even more so. Other herbs will work well, such as fresh oregano, basil or thyme. Get creative and try a couple of root crops, or several!
Heirloom Carrots
Marinated Carrots
1 Lb carrots- best fresh from your garden or farmer’s market
2 1/2 Tbsp Lemon juice
1/2 Tsp Dijon mustard or stone ground mustard
1/4 Cup Extra Virgin Olive Oil
1 to 2 green onions, chopped
1 Tbsp Fresh Parsley, chopped
1 Clove garlic, crushed
Fresh ground salt and black pepper, to taste
Bring a medium pot of water to a boil.
In the meantime, scrub and slice carrots into uniform slices. Matchsticks work well if using for garnish or presentation.
Blanch carrots in boiling water for about 2-3 minutes, or until just barely tender, but slightly crunchy.
Combine lemon juice, mustard, olive oil, onions, parsley and garlic in tight fitting jar with lid. Shake well to mix.
Pour marinade over carrots in sealable dish, season with salt and pepper. Refrigerate at least 8 hours or better yet, overnight.
Serve by themselves as a side dish, as a garnish or presentation.
Here are a couple of recipes that use fresh herbs- that you should soon have growing in your garden!
The first is the classic Basil Pesto. Make extra, freeze in small amounts for use later. We just finished using the last batch in a dinner that tasted like the height of summer. The second is a basic, classic tomato based pasta sauce that is not only easy to make, but lends itself to endless variations using what is fresh and on hand at the time.
You can easily have a fresh, incredibly tasty dinner on the table in 30 minutes with either of these recipes!
Basil Pesto Sauce
2 Cups fresh basil leaves, washed
3 cloves fresh garlic, mild flavored
2 Tbsp pine nuts or walnuts
1/2 Cup extra virgin olive oil
Salt to taste
1/2 Cup fresh grated aged Parmesan or Pecorino cheese
Makes about 1 cup.
Place all ingredients except grated cheese in food processor and puree until smooth, usually about 1-2 minutes. Add in grated cheese, pulse till mixed well.
Add to soups for a bright and fresh flavor, use as a sandwich spread or add to hot freshly cooked pasta for heavenly pesto pasta.
As basil production increases, make large batches to freeze into small single serving containers for use in the winter when you want a taste of summer. Most people think of pine nuts as the only nut to use, but experiment with other nuts including almonds and sunflower seeds for different flavor combinations. Use different basils as well, for the different flavors that they will bring.
Fresh Tomato Basil Sauce
1 Medium red onion, minced
1/2 Cup dry white wine
Pinch crushed red pepper flakes
3 Medium fresh tomatoes, peeled and chopped
1 Tbsp olive oil
1 Tbsp Balsamic vinegar
1 Tsp sugar
1/2 Tsp salt
1 Tbsp tomato paste
1 Cup fresh basil, chopped
Slow cook onion in wine over low heat in heavy bottomed sauce pan for 10-15 minutes, until liquid is reduced to a few tablespoons.
Add pepper flakes, tomatoes, olive oil, sugar, salt, Balsamic vinegar, and tomato paste. Simmer for 15-20 minutes, stirring occasionally until sauce is thickened.
Add basil, then remove from heat. Let sit for a couple of minutes to infuse basil flavor into sauce, then serve over fresh hot pasta.
Makes about 3 cups. Can be easily frozen for a quick, healthy and tasty dinner.
You can easily add fresh carrot thinly sliced, fresh oregano, different types of basil, fresh fennel sliced thinly, or whatever sounds good at the time. Experiment with different flavor combinations, use what is fresh and available at the time for new and great tastes.
A fast growing herb, oregano serves many purposes beyond the kitchen counter
Related to mint (but nowhere near as sweet), oregano is a popular herb found throughout Italian, Greek, and Mexican cuisines. Whereas Greek oregano is very strong and slightly bitter with a clove-like afterbite, Mexican oregano is almost all bitter, and can be almost tongue numbing. Oregano is great with anything involving tomatoes, and goes very well with savory dishes like eggs and roasted meats.
How to Grow:
Because it loves warm climate and direct sunlight, you want to plant your oregano only when you are sure the last frost has passed. It only takes a week-and-a-half to germinate, with the leaves ready for harvest after six. Since compost and manure have a tendency to adversely affect the final flavor of the leaves, it is best to plant the seeds (or transplants) fifteen inches apart in loose, moist soil and cover with mulch to combat weeds. Because it is drought tolerant, as long as you water it periodically, the plant will take care of itself.
Non-Culinary Uses:
Oregano can be used as a border for many gardens and walkways. It is a perennial and will
grow back each year. Many people enjoy its aromatic fragrance. Due to its high levels of an antiseptic called carvacrol (also responsible for its ‘pizza-like’ flavor), oregano acts as a bacterial inhibitor and an effective first-aid treatment for insect, spider, and even snake bites.
Culinary Uses:
Oregano is often used in many soups and pasta sauces. However, oregano is most widely recognized as the “special herb” which turns bland pizza sauce into real pizza sauce. You can make your own pizza sauce following the simple recipe below.
Ingredients Needed:
1 32 oz can of plain crushed tomatoes
1 8 oz. can of tomato paste
½ teaspoon of dried crushed oregano (Either True Greek or Sweet Marjoram will work well).
2 Tablespoons extra virgin olive oil
2 cloves minced garlic
¼ cup water
In a medium saucepan, heat the olive oil over medium heat.
Add the garlic and simmer over low heat for 2 minutes.
Add in the rest of the ingredients and mix well.
Simmer over low heat for 20 to 30 minutes.
Author Credits: Elizabeth Trementozzi Krause publishes her own Italian cooking website, www.simpleitaliancooking.com where she features more Italian recipes. She enjoys spending her time cooking and drinking espresso with friends and family. She and her husband love eating pizza with a dish of pasta on the side along with a nice green salad. She offers a newsletter each week featuring new recipes and tips.
https://underwoodgardens.com/wp-content/uploads/2010/03/Greek-Oregano21.jpg336448Stephen Scotthttps://underwoodgardens.com/wp-content/uploads/2019/06/Survey-Header.jpgStephen Scott2010-03-31 17:24:312015-11-01 18:53:32Heirloom Oregano: A Culinary Herb in a League All its Own
This is a great dinner for family or friends, and it doesn’t have to be Sunday. A whole roast chicken makes for an impressive tableside presentation followed by a delicious meal and the tender, tasty leftovers can be used for several other dishes, if there are any left!
For faster, more even roasting, cut the backbone out of the chicken with poultry shears or heavy duty kitchen shears. This allows the bird to lay flat in the roasting pan. Keep the backs in a freezer ziplock until you have several, then make chicken stock with the giblets, diced onions and celery, aromatic herbs such as savory, rosemary, thyme, salt and pepper and a bay leaf in a couple quarts of water. Bring to a boil, then simmer for a minimum of two hours, longer is better.
Pair this with some fresh homemade biscuits and you’ve got a proven winner! We found a great restaurant in the little town of Boulder, Utah called Hell’s Backbone Grill that makes the absolutely best biscuits that we’ve ever tasted! They are easy and quick to make and are positively addictive. We always make a double batch if we want any for the next couple of days. You can use the hot oven for both roasting the chicken and baking the biscuits.
Make sure to include plenty of vegetables, as they roast up well and balance out the rich roasted chicken flavors.
Herb and Vegetable Roasted Chicken
3-4 Lb chicken
1 lemon, halved
Fresh rosemary
Fresh thyme
8 cloves garlic, peeled and crushed
2 Tbsp butter, softened
Salt and fresh ground black pepper
4 small red onions, halved
8 small potatoes, halved
4-6 medium carrots
4 medium parsnips, peeled
Extra virgin olive oil
Heat oven to 450F. Rinse chicken, pat dry with paper towels. Place chicken in a large roasting pan or skillet. Cast iron is best. Squeeze lemon juice to cover chicken then put lemon halves, rosemary, thyme and 4 cloves of garlic into cavity. Rub chicken with butter, sprinkle with salt and pepper. Arrange remaining vegetables around chicken and brush with olive oil, season lightly with salt and pepper.
When oven is hot, roast for 15-20 minutes, then bast chicken with pan juices. Reduce heat to 375F and continue to roast for about 45 minutes more, basting every 15-20 minutes until skin is crisp and golden. Remove from oven, cover with lid or foil for 10-15 minutes (while biscuits are cooking) and let rest before carving. When removing chicken, reheat oven to 450F. By the time you are ready to bake the biscuits, the oven will be at temperature.
Black Powder Buttermilk Biscuits
This is our all time favorite biscuit recipe! You must have two things to be successful here- a hot oven and cold dough. These are made and bake quickly, so get everything ready before you start.
3 Tbs cornmeal
2 1/2 Cups flour
1 1/2 Tsp salt
1/2 Tsp baking soda
1 Tsp baking powder
1/2 tsp course black pepper
1 Tsp sugar
1 stick (1/4 Lb) butter- cold- cut into 1/2″ chunks
1 Cup buttermilk or substitute 1 cup milk with 2 tsp lemon juice
Adjust rack to middle position of oven, lightly oil cookie sheet or use a nonstick spray. Sprinkle 2 Tbsp over surface.
It’s best to use a food processor for the next two steps, then lightly knead the dough by hand or in a stand mixer. It makes for better biscuits!
Add flour, salt, baking soda, baking powder, pepper and sugar in food processor bowl, pulse 5-7 times with cutting blade to mix. Next, add butter chunks and run until mixture resembles coarse crumbs. This can be done with 2 knives and some patience. Transfer to stand mixer bowl.
Using low speed, fold mixture in while slowly pouring buttermilk over top. Mix well until dough is sticky and moistened through, with no dry patches. Turn dough onto lightly floured worktop, using floured hands to prevent dough from sticking. Using knife or bench scraper, cut dough in half and stack one piece on top of the other. Flatten with rolling pin, but don’t over do it. Repeat cut, flatten and stack for 3 more times. Add small amounts of flour necessary to keep everything from sticking. Dough will be very moist- as it should be.
Transfer dough to cookie sheet. Roll to about 1 inch thick, then cut into squares about 2×2″. Sprinkle with remaining 1 Tbsp cornmeal. Bake until golden brown, about 12-15 minutes.
This is a wonderful winter chowder, warming and hearty to chase away the cold winter blues. It uses readily available winter ingredients- potatoes, onions, garlic and carrots, along with some frozen corn. Homegrown frozen sweet corn will be the best, but a good quality frozen sweet corn will work.
I use this as a starting base for experimentation and new directions. This is perfectly delicious, however, just as it is! Lobster, crab or shrimp makes this an excellent seafood chowder. Fresh sausage gives a completely new flavor, especially if it is spicy or smoked. Smoked pork works magic as well. Use your imagination and unique, local ingredients to shape this into a new regional specialty in your area!
Corn and Potato Chowder
Sea Salt, to taste
1 Stalk celery, chopped coarsley
1 Medium carrot, chopped coarsley
1 Sprig fresh parsley, can use dried
1 Bay leaf
5 Black peppercorns
1/4 Lb. salt pork, or smoked pork
3 Medium yellow onions, peeled and diced
3 Cloves garlic, peeled and minced
1 1/2 Lbs. unpeeled red potatoes, cut into 1/2″ cubes.
4 Cups corn kernels- (about 6 ears worth)
3 Cups half and half
Cayenne pepper
Freshly ground black pepper
1 Tbsp. Chicken base- Better Than Bouillon is a great brand
10 Cups water
In a large, heavy stockpot (preferably cast iron) heat the water and mix chicken base. Once simmering, add celery, carrots, parsley, bay leaf and peppercorns. Cover and simmer over low heat for 1 1/2 hours, then increase heat to medium until stock is reduced to about 6 cups, about 10-15 minutes. If using seafood, cook in stock base now, only til just tender and remove for later.
Cook salt pork or sausage in separate heavy pan over medium low heat until crisp, about 20 minutes. Remove, drain and slice. Add to stockpot. In same pan, saute onions and garlic until soft and browned.
Add to stockpot along with potatoes and corn. Simmer on medium heat until potatoes are tender, about 10 minutes. Stir in half and half, cayenne and return to simmer. If using seafood, add now and heat through, about 5 minutes. Season to taste with salt and pepper. Ladle into bowls and serve hot.
Please let us know how you like it, and what adaptations you make!
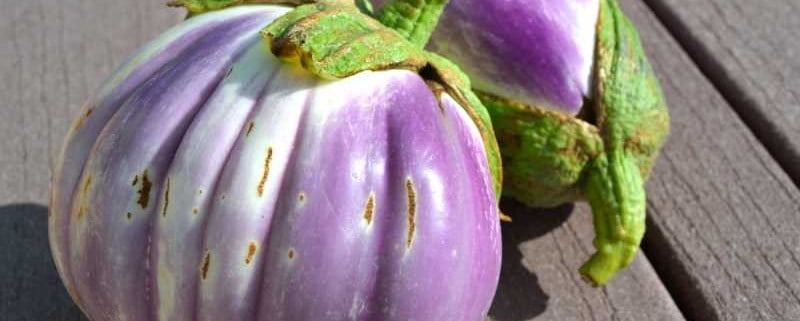
I’ve never liked eggplant. The taste was bitter but past that, remarkably bland with a similar texture. Not that exciting.
So I decided to grow some this year. This is something I recommend against to my customers- “Grow what you like to eat” is what I advise.
My reasons for growing something that I don’t like are simple; I also don’t like supermarket tomatoes, yet love the ones that I grow. I wanted to try one eggplant to see if it was different than what I had tasted before. It’s the supermarket vs. homegrown argument on a different level. Supermarket tomatoes are merely tasteless, whereas eggplant is unpleasant to me.
The first eggplant of the season was ready yesterday. A medium gorgeously purple beauty, surprisingly light in weight. I pulled the cookbooks out to see what made sense to try that would showcase the flavor of the eggplant and didn’t require the oven on for an hour, or at all. Marcella Hazan came to the rescue once again. She is an incredible chef and writer of the lesser known Italian cooking that most of us have never experienced. You get the recipe, and the reasons for the actions taken in the cooking and why to not shortcut the steps. Flavors are described in detail and reasons behind the techniques are given, something I’ve rarely seen. The stories behind each recipe are compelling as well, something I love from the heirloom seeds.
The recipe I tried is Eggplant Sauce with Bell Pepper, Tomato and Basil. I’ll give it to you at the end. The freshly sliced eggplant was not bitter, but had a slightly sweet flavor that compounded the smell of the fresh eggplant. I salted it according to the directions, which made it sweeter. I chose this recipe as it used more fresh ingredients from our garden. I’ve got some wonderfulGenovese Basil that has an incredible aroma and holds up in cooking. I don’t have the bell peppers or tomatoes yet, so will try it again when another eggplant is ripe.
The overall character is complex and slightly spicy with many individual flavors that come through, yet is in harmony as no single flavor overpowers another. Italian flavor at it’s finest! The flavors are not overbearing, as most common American Italian cooking has become, but are lively and pleasing. This is a lighter dish, perfect for summer cooking, and can be done outside on a grill if one is experienced at outdoor cooking, not just barbecuing. This is a dish I would prep ahead of time to do trail side at the end of a long day exploring the backcountry of Arizona or the Southwest. It’s not hard, but attention and patience are needed to bring the flavors out! The small investment of time is well worth it.
Here’s the recipe:
1 1/2 lbs eggplant
Salt
1 ripe bell pepper (yellow is best, but make sure it’s ripe)
3 Tbs extra virgin olive oil
3 garlic cloves sliced very thin
1/8 Tsp crushed red pepper or to taste
2 Tbs Italian flat leaf parsley- whole leaves, not chopped
1/3 Cup thinly sliced onion
1 Cup ripe fresh tomatoes, peeled and chopped. Canned Italian tomatoes will work.
1/3 Cup dry white wine
6 small basil leaves or 4 large ones, torn not cut into small pieces
6 green olives in brine, quartered
1 1/2 Tbs capers
1 Lb box dry pasta, penne is good choice
Slice eggplant in half. If seeds are dark, or if there a lot of seeds, scoop seeds out. Cut eggplant into 1 inch squares, put into colander rinse in cold water. Salt and let set for 45 minutes. This brings out the bitter liquid if there is any. Rinse again afterwards.
Split bell pepper in half, scoop out seeds and pith, then peel skin with swivel peeler. This removes the bitterness in the skin once cooked. Cut into thin strips.
Warm 3 Tbs olive oil in 10 inch skillet, then add garlic and chili pepper. Increase heat to medium, no more. Stir often just until garlic scent rises, no more.
Add whole parsley leaves. Careful, they will pop and sputter for a couple of seconds. Stir a couple of times, add onion and turn heat to low. Cook slowly until onion is soft. This increases the flavor by cooking slowly, and the garlic flavor is not entirely lost.
Add pepper strips, some salt and cook until pepper starts to be tender. Stir occasionally. You should have some liquid starting to build in the bottom of the pan.
Add eggplant, tomatoes, wine, basil, olives and capers. Stir several times to mix well. Slowly simmer with lid on for 40 minutes, watching liquid level. It should slowly decrease, and have almost no liquid at the end. Add a small amount if it looks dry. Stir occasionally during the simmer. Crack lid if too much liquid is remaining about 15 minutes before the end, or when you put the pasta water on.
Time cooking the pasta so its done just before the sauce, about 7-10 minutes. Toss pasta with sauce, adding 1 more Tbs olive oil and serve hot. Cheese is really not needed, but you can add a small amount of pecorino if you want. Don’t drown the delicate sauce in cheese!
Enjoy and let me know what you think! Please leave a comment!
Place sausage links onto a sheet pan and bake for 25 minutes, or until
done. Cut links in half lengthwise, then cut at an angle into 1/2-inch
slices.
Place onions and bacon slices in a large saucepan and cook over medium
heat until onions are almost clear. Remove bacon and crumble. Set
aside. Note- You can saute the kale at this step for extra richness in its flavor!
Add garlic to the onions and cook an additional 1 minute. Add chicken
soup base, water, and potatoes, simmer 15 minutes. Note- This is where I prefer to add my kale! Russian kale will take the simmer without losing its texture and flavor.
Add crumbled bacon, sausage, kale, and cream. Simmer 4 minutes and serve.
Stir-Fried Kale and Broccoli Florets
Good for an unusual side dish. Can be used for a light fall lunch or dinner starter.
INGREDIENTS
1/8 cup extra virgin olive oil
7 cloves garlic, sliced
1 chile pepper, chopped (optional)
1 head fresh broccoli, chopped
1 bunch kale, stems removed and chopped
1/4 cup sun-dried tomatoes, cut in thin strips
juice of 2 limes
salt
DIRECTIONS
Heat olive oil in a large wok or skillet over high heat. Stir in garlic and chile pepper; cook for 2 minutes, stirring frequently. Stir in broccoli; cook 1 minute. Add kale, and cook 2 minutes, stirring frequently. Stir in sun-dried tomatoes. Pour in lime juice, and season with salt to taste. Toss well.
Pork Tenderloin with Steamed Kale
Amazing showcase of pork and kale. For extra flavor, marinate the tenderloin for a couple of hours, up to overnight.
INGREDIENTS
2 limes, juiced
1 cup olive oil
2 teaspoons dried cilantro
1 teaspoon cracked peppercorns
1 teaspoon garlic salt
1 (1 1/2 pound) pork tenderloin
1 pound kale, stems removed and leaves coarsely chopped
DIRECTIONS
Preheat oven to 350 degrees F (175 degrees C). In a small bowl , whisk olive oil with lime juice. Season with cilantro, garlic salt, and peppercorns.
Brush the pork tenderloin with three tablespoons of the lime dressing. Wrap in aluminum foil, and place on in a large baking dish. Roast in preheated oven for 30 to 45 minutes, or until a meat thermometer reads 170 degrees. Note- can be slow grilled on indirect heat on a BBQ if the weather is too hot or you want a smoky flavor!
While the tenderloin is cooking, place kale in a steamer. Cook for 20 minutes, or until tender. You can saute the kale now for a more intense flavor.
Slice the pork tenderloin into 1 1/2 inch thick slices. Serve on top of the kale. Whisk the remaining dressing, and drizzle over pork and kale. Make sure to serve the kale under and on the side of the pork, don’t just use it as a garnish! It adds a depth of flavor to the pork.
There is some starters for what to do with kale. There are a lot of great bean/sausage/kale recipes that will keep you warm this fall and winter. Please let me know what you think, and share your experiences.
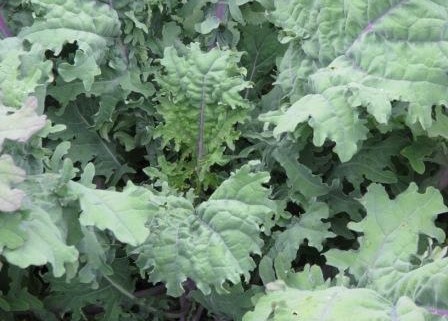
https://underwoodgardens.com/wp-content/uploads/2009/07/Russian-Kale1.jpg336448Stephen Scotthttps://underwoodgardens.com/wp-content/uploads/2019/06/Survey-Header.jpgStephen Scott2009-07-01 13:47:162022-12-12 14:34:46Heirloom Red Russian Kale Recipes