Why Grow Onions from Seed?
Many gardeners begin growing their onions from transplants or bulbs bought at their local garden center. They are convenient, easy to grow and a great way to learn about growing delicious onions in your garden, but they have some drawbacks. Like tomatoes and peppers, the selection is limited to what the grower chooses and freshness isn’t always a given.
Growing onions from seed opens up a world of diversity in shapes, sizes, flavors, and colors to grow. Starting from seed typically rewards you with bigger and better quality onions, with larger harvests being a bonus from the abundance of seed in a packet.
Onions grown from seed almost always perform better than those grown from sets. They are less prone to disease, store better, and bulb up faster, especially if you have some knowledge and tips to do it right. Growing onions isn’t quite like growing other vegetables, so here’s how you can grow better this season!
Types of Onions – Long Day vs Short Day vs Intermediate Day

Long vs Short Day Onion Zones
Which onion varieties are best for you depends on where your garden is located. There are three different types of onions and picking the right type is key to growing a great crop.
Short-day onions need 10 – 12 hours of daylight to form bulbs. They’re perfect for gardeners in the southern US where summer days are not as long throughout the growing season. Growing short-day onions in the north results in tiny bulbs that go to flower early because the bulbs stop growing once the days lengthen.
Long-day onions need at least 14 hours of daylight to form bulbs. They’re best for gardeners in the northern tier of the U.S. and Canada. Just like growing short-day onions in the north, long-day onions won’t form bulbs in the south because the days aren’t long enough to trigger bulb formation and you wind up with small bulbs or bunching onions.
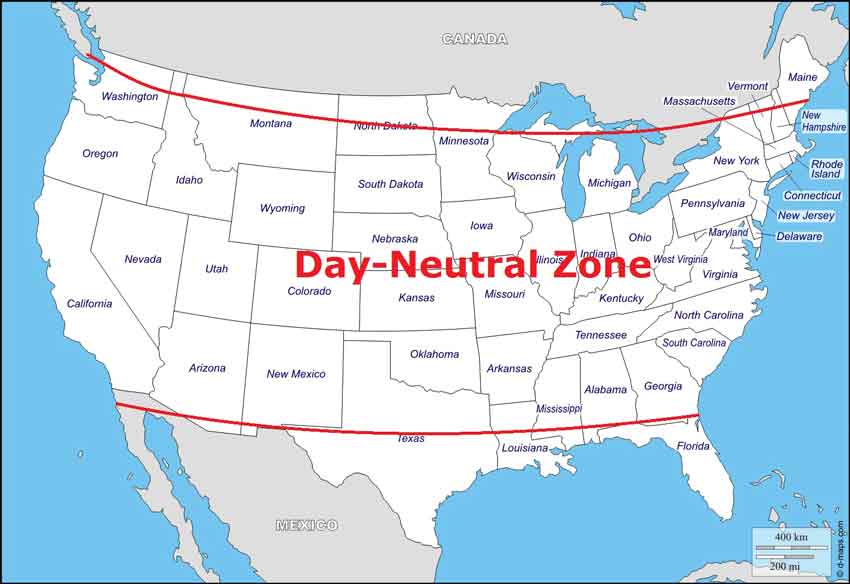
Intermediate Day Onion Zone
Intermediate-day onions form bulbs when the daylight ranges from 12 – 14 hours long. If you live somewhere across the mid-section of the US, day-neutral or intermediate onion varieties are the best fit.
Three Ways to Grow Onions From Seed
There are three distinct ways to grow your onions from seed and the best way for you depends on your particular gardening style, equipment and available time. Onions grow best in loose, fertile soil that drains well.
1- Direct Sowing in the Garden
The simplest method is direct to sow your onion seeds directly into the garden soil. Before sowing, refer to the garden bed preparation section below. Draw a line down the middle of the bed about 1/8 – 1/4 inch deep and sow the onion seeds with about 3-inch spacing to avoid crowding. Lightly cover the seeds and dampen well. Onion seeds will tolerate a light frost.
The pros of this method are its simplicity – sow your onions once, then harvest when ready. No transplanting for you!
The cons are making sure you plant the seeds early enough for the bulbs to develop by mid to late fall. You also have to deal with weather events and being able to possibly protect the seedlings if there is hail or heavy rains. Most northern states don’t have a long enough season to support direct seeding.
The good news is experimenting is inexpensive – a packet of onion seeds will set you back a grand total of anywhere from $3.15 to $3.35, and you get about 500 seeds to work with. You’ll also invest a little bit of your time in learning what works best for your garden.

Onion seedlings in tray
2- Starting in Trays
Starting your onion seeds in trays requires a small amount of equipment or conditions and some time on your part. You’ll need a tray to catch the excess moisture and either a flat with cells or individual pots such as peat pots, paper pots, or similar filled with a high-quality pre-moistened seed starting mix. If you aren’t sure which mix works well, read our Seed Starting Mix article. You can also use a container about 3 – 4 inches deep and fill it almost to the top instead of pots or flats. Used berry or take-out containers work well with holes poked in the bottom and lid. Start your seeds about 10-12 weeks before transplanting date, which is about 2-4 weeks before your last frost date.
Plant the seeds by placing 2 seeds per cell or pot and covering with about 1/8 inch of soil. If you are using the container method, scatter the seeds on top of well-moistened potting soil then cover with the 1/8 inch of additional soil. Label the containers or flats, place in the catch tray and cover with a humidity dome or lid. Place on a heat mat, heating pad, or warm area where it’s a constant 70-75°F. Once the seeds start sprouting – about a week – remove the humidity dome and move to a cooler area, about 60-65°F. Give them plenty of supplemental light with a grow light or other fixture for about 12 hours per day. Trim the tops back when they are about 5 inches tall to encourage stronger root and stalk growth.
Onions will tolerate cool spring temperatures but must be acclimated first – a process called hardening off. Start about 6 weeks before your last expected frost date (look yours up here) by giving them exposure to natural sunlight, cooler temperatures, and a less moist soil environment. Begin by placing the tray in a sheltered location outside during the day for an hour or two, increasing a little each day until they are outside from morning until night time. Onion seedlings will tolerate a light frost, so don’t worry if you get a late-season cold snap!
They are now ready for transplanting, and you should be about 2 weeks before your last expected frost date. Before transplanting, refer to the garden bed preparation section below. To transplant, remove the soil blocks or gently dump the tray out, then tease the seedlings out of the potting soil into clumps of no more than 2, placing them 3-4 inches apart next to the furrow. Stage or pre-place all of the transplants before planting them to save time and your back!
Using a dibber or other similar tool, poke a hole into the furrow about 3-4 inches deep and drop each clump in – don’t worry, this isn’t too deep! Gently firm the soil around the transplant and keep the beds well watered and weeded until the onions are well established.
The pros for this approach is you know exactly where your onions are, as you can see the green tops sticking out. You can also select the strongest seedlings to transplant, creating a better chance of a good harvest.
The cons are that seedlings will have some transplant shock and you’ll lose some – grow extra transplants to fill in the gaps. Young, tender greens are snacks for all sorts of critters in early spring, so you may need to provide some protective cover until they are more established.
3- Winter Sowing
This is perhaps the second easiest option as it takes little time on your part and almost no equipment. Winter sowing is basically cold-stratifying your onion seeds to the outside temperatures, then they sprout when conditions are right in the spring. You can plant your seeds this way anytime from early December to mid-February in most locations.
Seed sowing is similar to starting seeds in a container, except you skip the heat mats, grow lights and all of the other equipment. Start with a container that has some holes in the bottom for drainage, fill to within an inch of the top with good quality dry potting soil and sow your onion seeds across the top with a sprinkling motion, giving them about 1/4 to 1/2 inch spacing. Poke 1/4 inch holes in the lid for ventilation and put it on the container after labeling it with the date and type of onion you planted.
Now place the container in a shady, protected spot outside. It doesn’t matter if it freezes or snows – the onion seeds are acclimating to the changing conditions and will remain dormant until the conditions are right. This is why you use dry potting soil!
When the temperatures and day length are right, your onion seeds will start sprouting inside the container. As the weather starts to warm up during the day, check your seed container every couple of days for signs of sprouting. Once you see the tiny bits of green peeking out, then you’ll need to water the potting soil, keeping it slightly moist but not wet. As they grow, open the lid on warm days and close it at night, still keeping it out of direct sun. If you get a hard freeze once the seedlings have germinated, cover the container with a blanket or towel at night to protect them, but remove it next morning.
As soon as you can work your garden soil in early spring, transplant your seedlings just like if you had started them indoors. Before transplanting, refer to the garden bed preparation section below. You don’t need to harden them off because they’ve been outside all winter and are acclimated to the temperatures.
The pros to this method are the plants are used to the natural temperature and light cycles and are primed to germinate at the right time. They usually form larger bulbs more consistently as well.
The cons are remembering to check on the container that might be out of sight outside, especially when the temperatures warm up.
Growing Bed Preparation Before Sowing or Transplanting
Prepare your garden bed for either sowing or transplanting before you need it to save time, back strain and headache. The basics are the same – dig a furrow about 4 inches wide and deep, then fill it with rich, well-aged compost. It’s best to do this in the fall before the ground is too hard, but it can be done in early spring as soon as the ground can be worked.
Mulched Onions
Onion Growing Tips
Start with fresh seed and seed starting or potting soil mix each year. Onion seed germination decreases after the first year, so why chance it? Fresh mix minimizes the chance of diseases during the long germination and seedling periods.
If starting inside, bottom heat really speeds seed germination up. 70-75°F soil temperature can create sprouts in about a week, versus 2 or 3 weeks at cooler temperatures.
Feed only the onion roots – just underneath the onion itself. They have short, shallow roots and can’t reach far, so provide the rich, well-aged compost where they can use it best.
Onions don’t compete with weeds very well because of their slow growth and small root structures. Weeds will significantly reduce your onion harvest, but there are better ways to fight weeds than weeding. Minimize weeding by mulching heavily between seedlings after transplanting.
Water onions efficiently with a drip system or soaker hose placed right next to the plants – remember their short roots. Doing this minimizes the amount of water they need, as well as reducing available water to potential weeds.
Get Started
Congratulations! You now know a lot more about how to grow delicious onions from seed and why you would want to. You’ve got several tools to use in planning your garden for onions and how to set yourself up for success this season.
As always, please let us know your thoughts, experiences, or questions in the comments below. If you like this, sharing with your circle of friends helps us help them!